Tuesday, September 20, 2011

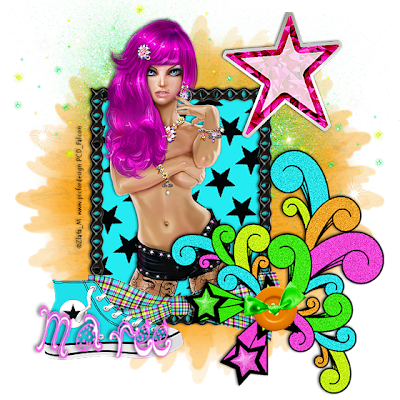
Diva Star Licious.♥


My Tutorials are strictly my own creations, if they resemble another it is purely coincidence. This was written with the use of PSP X2. You may create it any version of PSP.

Supplies Needed.

Scrap kit Stardom Licious from Willowgemz Designz .You can get Here.

Art work I am using from Zlata_M. Remember to purchase a license to use this art work.
You can do so at Pic For Design.

Font:Starberry Swirl Deli

Mask:by Designs by Vaybs DBV_135 Here


Image is better to have larger to work with then we can crop and resize when completed.
Open 700 x 700 image.
C/P = Copy and Paste.

C/P SL_frame7_wg click inside with Magic wand. Selections/Modify/Expand by 23.
C/P SL_Paper6 resize 80%. Selections/Invert/Delete, move below frame layer.
Add drop shadow to frame.
Add your tube of choice resize if needed, add drop shadow.
C/P SL_bow7 paste at bottom of frame, add drop shadow.
C/P SL_shoe1_wg position on left of frame then add drop shadow.
C/P SL_swirl 04_wg position on right bottom of frame.Resize 70%, add drop shadow.
C/P SL_button1_wg resize 50% then place in center of swirl add drop shadow.
C/P SL_star4 position at top of frame right side. Resize 85% then add drop shadow.
C/P SL_burst1_wg above background layer position then duplicate.Image/Mirror.
C/P SL_Paper11_wg above background layer, apply mask/merge/merge group.


Add your Artist © and your name then crop and save.
This is only a guide and feel free to use any other element you wish.
Most of all have fun creating.


Written and copyrighted to Maree (aka Falcon) 2011.
Under no uncertain terms are you allowed to make money
from anything produced from this tut, this is against my TOU's.

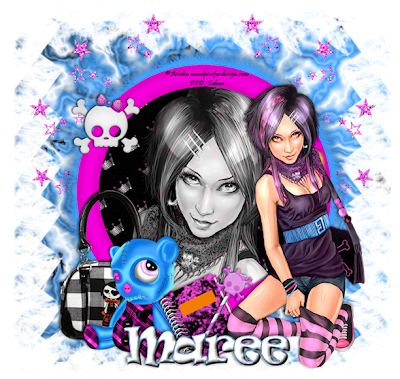
Emo School Days ♥


My Tutorials are strictly my own creations, if they resemble another it is purely coincidence. This was wiriten with the use of PSP X3. You may create it any version of PSP.

Supplies Needed.

Scrap kit Emo Back To School from Designs by Joan.You can get Here.

Art work I am using from Aivelin,remember to purchase a license to use this art work, You can do so at Pics For Design Here

Font:Ravie

Mask: by Dee's Design Depot DD_Mask27 Here.


Open new Image 700 X 700 its better to have larger to work worth. We can crop and resize when completed. C/P = copy paste

C/P Frame 2 click inside with Magic wand.Selections/Modify/expand by 5.
C/P Paper 4 position I resized paper by 65%. Selections/Invert/hit Delete,
move below frame layer.Give your Frame a Drop shadow.
C/P under frame layer a closeup of your tube position, then hit delete.
In Blend Mode select-Luminacy (L).
C/P Back(small bag) place on left of frame, add drop shadow.
C/P Sad teddy position resize 65%, add drop shadow.
C/P Book position in center of frame resize 42%. Image/FreeRotate 35 Left.
Add drop shadow.
C/P Image 19 (pencil) resize 45% position on book.Image/FreeRotate 35 Right.
Add drop shadow.
C/P Cute-girl resize 85% position on left of frame, add drop shadow.
C/P above background layer StarSpiral, position above frame on right.
Right click on layer/Duplicate.Image/Mirror.
C/P Paper 3 above background layer.Apply mask/merge/merge group.


Add your Artist © and your name then crop and save.
This is only a guide and feel free to use any other element you wish.
Most of all have fun creating.


Written and copyrighted to Maree (aka Falcon) 2011.
Under no uncertain terms are you allowed to make money
from anything produced from this tut, this is against my TOU's.

Raising Howi ♥


My Tutorials are strictly my own creations, if they resemble another it is purely coincidence.

This was written with the use of PSP X2. You may create it in any version of PSP.

Supplies Needed.

Scrap kit Spider Delight from Dnscraps.You can get Here.

Art work by UnHoly Vault. Remember to purchase a license to use this art work.
You can do so Here.

Font:Metalic Avacodo

Mask:Designs by Vaybs DVB_111 Here

Plugin-Xfeno 2-Constellation

Animation Shop
Template by Dee's Designs-Halloween.

Please remember to leave some love♥

C/P = copy and paste
Open template then delete © layer.
Select left purple square laer. Selections/Float/Defloat.
New layer copy paste Spiderdelightpaperdn position, hit delete.Repeat for right
purple square layer.
Repeat for all other layers using different papers of choice.
Remeber to delete the original layer/s.

C/P Spiderdelightdn2 position, see tag.
C/P medi_gravebag43 position on left of layer resize 42%
, add drop shadow.
C/P Spiderdelightbook resize 25% then use Pick tool to angle to the left,
add drop shadow.
C/P Spiderdelightskulls place on left of layer resize 35%,
add drop shadow.
C/P Spiderdelightspiderlightdn place on top on gravestone,
add drop shadow.
C/P Spiderdelightspiderdn5 position on top square.
Add drop shadow.
C/P your tube below wordaart layer, resize if needed,
add drop shadow.
C/P Spiderdelightbabybat resize 25% position at top of circle,
add drop shadow.
C/P Spiderdelightstone above background layer position at bottom of layer.
Click on wordart white layer.Selections/Select all/Float/Defloat, new layer.
Change your BG color palatte to #fb4b04.Use your Flood fill new layer, deselect.
You will have 4 layers of wordart, move the bottom 3 layers till you
have the desired affect.

C/P Spiderdelightpaperdn12 as new layer, apply mask/merge/merge group.

Add your Artist © and your name then crop and save if you dont wish to Animate.
This is only a guide and feel free to use any other element you wish.
Most of all have fun creating.

Animation

Open Animation shop then click on psp.

Click on spiderweb layer and duplicate twice rename layers web 1,2,and 3.
Click on web 1 layer then Effects-Xfeno2-Constellation apply these settings:

Repeat for web layers 2 and 3 remember to click Random seed button
once for each layer.
Close out web layers 2 & 3. Edit/copy special/copy merged.
Click into AS right click Paste as New Animation.
Back in Psp closeout web layer1 open 2,Paste click in As Paste after current frame.
Do this again for web layer 3.
Select All (ctrl+A)then Alt+Enter change Frame Propeties to 25.
Save as Gif.


Written and copyrighted to Maree (aka Falcon) 2011.
Under no uncertain terms are you allowed to make money
from anything produced from this tut, this is against my TOU's.

Saturday, September 17, 2011

My Heart Beats 4 U ♥


My Tutorials are strictly my own creations, if they resemble another it is purely coinsidense. This was wiriten with the use of PSP X2.
You may create it any version of PSP.

Supplies Needed.


Art work I am using is supplied with kit © Medi.


Scrap kit- For The Love of Scrappin from Sleek n Sassy.

You can get Here.

Font:New Unicode

Mask by Weescotslass WSL_84
Plugin Used:Warp Brush

Animation Shop .


Open new Image 700 x 700, its better to have larger layer to work with then
we can crop and resize when completed. C/P= copy and paste.

C/P Double_Frame place on left of layer, resize 75%. Click inside frame with Magic wand.
Selections/Modify/Expand by 6, C/P Paper 11, Selections/Invert/hit delete
/move below frame layer.Give your frame a Drop shadow.

C/P Decorative_Heart move to right of layer.Click inside with Magic wand.
Selections/Modify/Expand by 5. C/P Paper 1/resize paper layer by 50%.
Selections/Invert/hit delete/move below frame layer.Give frame a drop shadow.

C/P Love_2 wordart above gold heart resize to fit, add drop shadow.
C/P Envelopes resize 75% then position them to your liking. Add drop shadow.
C/P Box_2 top of frame resize 65%, add drop shadow.
C/P Balloons place on fright of frame, resize 75%, add drop shadow.
C/P Butterflies place over frame. resize 85%, add drop shadow.
C/P Teddy place on lower frame, resize 75%, add drop shadow.
C/P Tube of choice I used one supplied with kit, resize if needed, add drop shadow.
C/P Little Hearts above background layer, add drop shadow.
C/P Paper_9 then apply mask/merge/merge group. Resize layer 110%
C/P Paper_6 above mask layer again apply mask/merge/merge group.
Click on Teddy layer, duplicate, then closeout original layer.
Select Warp Brush(on left side of psp)set yours to these settings:

Position arrow over heart of Teddy and click once.

Add your Artist © and your name.
This is only a guide and feel free to use any other element you wish.
Most of all have fun creating.

Animation
Open Animation shop.
Back in Psp close out the duplicated Teddy layer/open orignal layer.
Edit/Copy special/copy merged.
Click into AS paste as new animation,
Back in Psp close out orignal Teddy layer open duplicated layer.
Edit/Copy special/copy merged.
Click in AS then paste after current frame. Select All (Ctrl+A).
Then hit the Alt and Enter key change Frame Properties to 100 click ok.
Animation/Resize Animation/ resize by 70% then save as a Gif.

Written and copyrighted to Maree (aka Falcon) on .
Under no uncertain terms are you allowed to make money
from anything produced from this tut, this is against my TOU's.

Color Me Purple ♥


My Tutorials are strictly my own creations, if they resemble another it is purely coinsidense. This was wiriten with the use of PSP X2. You may create it any version of PSP.

Supplies Needed.

Scrap kit Purple Rains from Kairinakat Kreations
You can get Here

Art work I am using from ©Myka Jelina remember to purchase a license to use this art work.

Font: Rankle

Mask:Weescotlass WSL_84

Animation Shop.


Open new Image it is better to have larger to work with then
we can crop and resize when completed.

Open new image 750 x 650 transparent background.

Paste K2 Element 11 as new layer, add drop shadow.
Click inside with Magic wand-Selections-Modify-Expand by 5, Paste K2 paper 11 as new layer.
Selections-Invert-hit delete, move below frame layer.
Select your closeup tube/s and place in frame. Add drop shadow to them.
Right click on any layer-Merge-Merge group.
Paste K2 Elelment 33 as new layer psoiton on top of gem then resize to fit, add drop shadow.
Paste K2 Element 16 below frame layer, add drop shadow.
Paste K2 Element 56 resize position at botom of frame, add drop shadow.
Paste your main tube resize if needed, add drop shadow.
Paste K2 Element 15 as new layer position at bottom of main tube, add drop shadow.
Paste K2 Element 49 as new layer position to your liking around frame.I duplicated it twice.
Paste K2 Element 7 as new layer resize position on right of layer, add drop shadow
New layer Selections-select all-paste K2 Paper 2 into selection-deselect.

Apply mask, merge group.

Duplicate this layer twice.

Apply these settings using Xfeno2-Constellation


Repeat on layers 2 & 3 hitting the random button each time. Close out layers 2 n 3.

Add your Artist © and your name then crop and save if you do not wish to animate.
This is only a guide and feel free to use any other element you wish.
Most of all have fun creating.


Animation

Open your Animation shop then click back to Psp.
Edit-Copy Special-Copy merged.
In AS right click and paste as new animation.
Back in Psp closeout BG layer1 then open BG layer 2 then repeat as above,
this time pasting After Current Frame.
repeat for 3rd background layer.

Save as a Gif and your finished.
Thank you for using my tutorial.


Written and copyrighted to Maree (aka Falcon) 2011 .
Under no uncertain terms are you allowed to make money
from anything produced from this tut, this is against my TOU's.

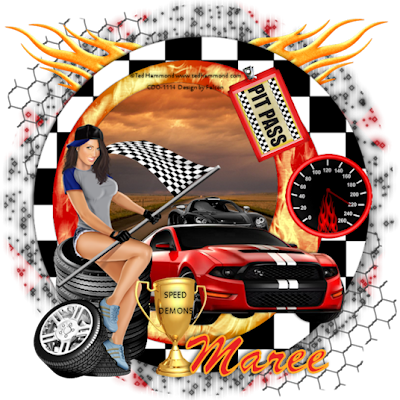
Speed Demons ♥


My Tutorials are strictly my own creations, if they resemble another it is purely coinsidense. This was wiriten with the use of PSP X2. You may create it any version of PSP.

Supplies Needed.

Scrap kit Race Driver from Rebellious Scraps.
You can get Here.

Art work I am using from © Ted Hammond.
Remember to purchase a license t o use this art work.

Font: Signature

Mask by Weescotlass WSL_74

Open new Image 700 x 70. This is better to work with then we can crop and resize when completed.C/P =copy and paste.

C/P Frame 4 as new layer, click inside with Magic wand.Selections/Modify/Expand by 20.
C/P Paper 5 resize 75% postion over frame.Selections/Invert/hit delete, move below frame/deselect.Give your frame a drop shadow.
C/P Frame 2 as new layer, add drop shadow.
C/P Car 1 as new layer. Resize 75%,Image/Mirror.Position then add drop shadow.
C/P Car 3 as new layer below car 1 layer. Resize 35%, Image/Mirror, add drop shadow.
C/P Stack of tyres as new layer, resize 65% move to left of layer.
Add your tube now resize if needed add drop shadow.
C/P Tire 1 as new layer position near stack then resize 55%,
add drop shadow.
C/P Trophy as new layer place next to tyres, add drop shadow.
C/P Pass as new layer resize 32% move to top of frame then use your Pick tool
to angle it, add drop shadow.
C/P Speedometer 2 as new layer then resize 65% position above car, add drop shadow.
C/P Wire 2 as new layer position at bottom of frame then duplicate, Image/Flip.
C/P Flames 1 as new layer above wire layer. Position near top resize 46%, see tag for placement.Duplicate/Image/Mirror, add drop shadow.

Click on background layer/select all C/P Paper 3 into selection.
Apply mask/merge/merge group.


Add your Artist © and your name then crop and save.
This is only a guide and feel free to use any other element you wish.
Most of all have fun creating.


Written and copyrighted to Maree (aka Falcon) 2011 .
Under no uncertain terms are you allowed to make money
from anything produced from this tut, this is against my TOU's.

Sunday, September 4, 2011

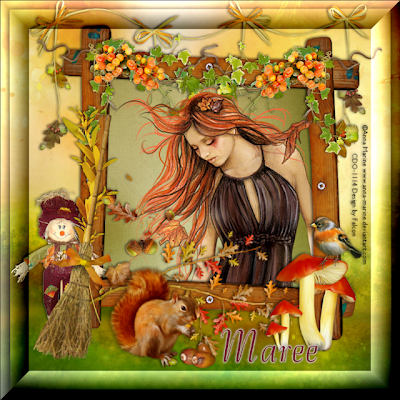
Rustling's of Autumn ♥


For this Tutorial you will need.


A Tube of your choice I am using the awesome artwork of © Anna Marine ,
You will need a lincence to use her artwork. You will find her at CDO.
Elements and Papers from a scrap Rustlings Leasves by *DarkMoon's Dreams *
you can find it Here.

Font: BernhangTango
Drop Shadow of choice.

Remember to Save Often!!!

Let's create

Open new image 700 x 700 transparent background.
Paste frame02 as new layer, add drop shadow.
Click inside with Magic wand-selections-Mpodify-Expand by 4.
Paste paper 03 as new layer-Selections-Invert-hit delete, move below frame layer.
Paste paper 02 as background layer.
Paste branch 03 as new layer above background layer, resize to fit add drop shadow.
Paste your main tube and resize if needed. Add drop shadow.
Draw out a square around the top of the tube.
Selections-Promete Selections to layer,Deselect then
move above branch 03 layers.
Paste leaves 01 as new layer resize then postion, add drop shadow.
Paste branch 02 as new layer above frame layer, add drop shadow,
duplicate-Image-Mirror. Add drop shadow.
Paste branch as new layer, resize position add drop shadow.
Paste banch 04 as new layer, resize position add drop shadow.
Paste mushroon 02 as new layer resize position add drop shadow.
Paste bird as new layer resize position on top of mushroom, add drop shadow.
Paste acorn 01 as new layer resize position then add drop shadow.
Paste squirrel as new layer resize position near acorn add drop shadow.
Paste scarecrow 01 as new layer resize position on side if frame, add drop shadow.
Paste broom as new layer position on side of frame than add drop shadow.

Right click on backgrund layer-Merge visible, then apply these settings
using Filters Unlimited 2.


Add your Artist © and your name then crop and save.
This is only a guide and feel free to use any other element you wish.
Most of all have fun creating.


Thank you for using my tutorial.


Written and copyrighted to Maree (aka Falcon) on 5th September 2011.
Under no uncertain terms are you allowed to make money
from anything produced from this tut, this is against my TOU's.

Any similarities to this tutorial are purely coincidental.

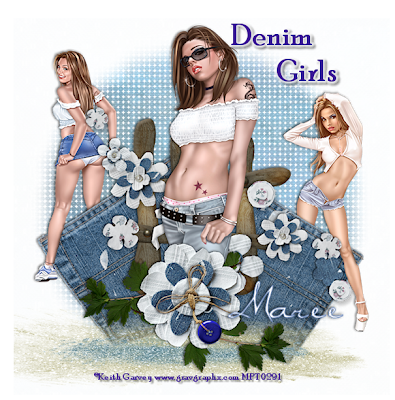
Denim Girls ♥


For this Tutorial you will need.

A Tube of your choice I am using the awesome artwork of ©Keith Garvey ,
which you must have a license to use you can get one at PTE
* Please note that I purchased my tube from MPT *
Elements and Papers from a scrap Denim Blues by Kesha *KnC Scrapz*
you can purchase it Here.
Font: Ponytail Script
Drop Shadow of choice.
Mask by *Dee's Dsigns*, it's #DD_17 you can download it Here
Remember to Save Often!!!

Let's create

Open new image 700 x 700 transparent background.

Paste Pocket 1 and 2 as new layers resize, add drop shadow.
Image-FreeRotate 35 Left on Pocket 1 then 35 Right on Pocket 2.
Add your tubes and position them. Using your Eraser remove parts of pocket
near outer leg/s on tube/s.
Paste Fence as new layer-resize-postion, add drop shadow.
Paste your main tube now and resize and postion in center of layer.
Add drop shadow.
Paste Flowers as new layer-resize then position, add drop shadow.
Paste Branch as new layer, add drop shadow,positon then duplicate -Image-Mirror.
Paste Flower1 as new layer, add drop shadow, resize position.
Paste Buttonrope-resize-positon on Flower1, add drop shadow.
Paste Glitter as new layer below Fence layer.

New layer select all Paste paper6 into Selection, apply Mask/Merge.

Add your Artist © and your name then crop and save.
This is only a guide and feel free to use any other element you wish.
Most of all have fun creating.

Thank you for using my tutorial.

Written and copyrighted to Maree (aka Falcon) on 4th September 2011.
Under no uncertain terms are you allowed to make money
from anything produced from this tut, this is against my TOU's.
Any similarities to this tutorial are purely coincidental.