Showing posts with label ♥ PTU ♥. Show all posts

Wednesday, January 25, 2012

Sweet For My Sweet ♥


My Tutorials are strictly my own creations,
if they resemble another it is purely coincidence.
This was written with the use of PSP X2.
You may create it any version of PSP.

Supplies Needed.

Scrap Sweet Love by Lulys Design .You can purchase it at Scrappindollars Here.

I'm using the artwork of ©Keith Garvey. Currently available at PTE Here.
you must purchase a license to use his artwork.

Font of choice

Mask_352 by Weescotslass Here.

Open new image 700 x 700 transparent background.

Open Frame heart copy paste as new layer.Click inside frame with Magic wand.
Selections Modify Expand by 8 open paper 17 copy paste as new layer arrange over frame.

Selections Invert tap delete, drag below frame.
Open your tube coopy paste as new layer arrange tap delete.
Deselect.Add drop shadow to frame and tube layers.
Layers Merge Merge Visible.
Open Star Love copy paste as new layer arrange bottom of frame.
Open banderin copy paste as new layer resize 75% arrange at top of frame.Add drop shadow.
Open lazo2 copy paste as new layer resize 25% arrange on banderin then duplicate Image Mirror.Give both a light drop shadow.
Open cupcakeheart copy paste as new layer resize 42% arrange on layer add a drop shadow
Open cupcakelove copy paste as new layer reisze 44% arrange on layer add a drop shadow.
Open be mine bear copy paste as new layer resize 65% arrange on layer add drop shadow.
Open cupcakeflecha copy paste as new layer resize 43% arrange on right of layer
in front of bear add drop shadow.
Open cupcakecheery copy paste as new layer reisze 46% arrange on left of
layer next to flecha cupcake, add a drop shadow.
Click on background layer select all open paper12 copy paste into selection.
Apply mask Merge Merge group.


Add your Artist © and your name then crop.

Thank you for trying my tutorial, I hope you enjoyed it.
I'd love to see your results so that I can show them on my Blog.

Tutorial by © Maree *Falcon* (aka DesignbyFalcon) 25th January 2012.

Tuesday, January 24, 2012

Toast To Love ♥


My Tutorials are strictly my own creations,
if they resemble another it is purely coincidence.
This was written with the use of PSP X2.
You may create it any version of PSP.

Supplies Needed.

Scrap VioletsrBlue by Cari-Black Widow Creationz .
You can purchase it at Scrappindollars Here.

I'm using the artwork of ©Ismael Rac.
Please do not use unless you have a license.
Currently available Here

Font of choice.

Mask_79 by Desiznz by Vaybs Here

Open new image 700 x 700 transparent background.

OPen BWC_VioletsrBlur_EL26 copy paste as new layer arrange on left of layer, duplicate Image Mirror.Give both a light drop shadow.
OPen BWC_VioletsrBlur_EL11 copy paste as new layer above background layer,
add drop shadow.
OPen BWC_VioletsrBlur_EL2 copy paste as new layer arrange on left of layer see tag.
Duplicate Image-Mirror give both a drop shadow.
OPen BWC_VioletsrBlur_EL4 copy paste as new layer aroang ontop of heart right side
add drop shadow.
OPen BWC_VioletsrBlur_EL15 copy paste as new layer resize 65% Image Mirror
arrange on beads.Add drop shadow.
OPen BWC_VioletsrBlur_EL37 copy paste as new layer resize 55%
arrange in center of layer add drop shadow.
Open your closeup of tube copy and paste as new layer arrange in center
Click on Blend Mode- change to Luminace (L) then lower the Opacity to 32.

Open your tube copy paste as new layer arrange on left of layer add drop shadow.
OPen BWC_VioletsrBlur_PP6 copy paste as new layer apply mask Merge Merge group.


Add your Artist © and your name then crop.
This is only a guide and feel free to use any other element you wish.
Most of all have fun creating.


Written and copyrighted to Maree (aka Falcon) 24th January 2012.

Sunday, January 22, 2012

Breath Of An Angle ♥


My Tutorials are strictly my own creations,
if they resemble another it is purely coincidence.
This was written with the use of PSP X2.
You may create it any version of PSP.

Supplies Needed.

Scrap Breath Of An Angel by Conchi-DnScraps .
You can purchase it at Scrapetizing Here.

I'm using the artwork of ©Zindy Nielsen Currently available Here.

Font of choice.

Mask_111 by Vaybs Here.

Image is better to be larger to work with then we can crop and resize when completed.

Open 700 X 700 transparent Image.

Open Breathofangeldnscrapsglitterframe copy paste as new layer.
Click inside frame with Magic wand.
Selections Modify Expand by 4. Add new raster layer.
Open Breathofangeldnscrapspaper copy paste into selection on new layer.Deselect.

Open Breathofangeldnscrapscloud2 copy paste as new layer resize 50
arrange in center of frame.
Open Breathofangeldnscrapsglitterangel copy paste as new layer
resize 45% arrange on cloud.
Open Breathofangeldnscrapsheartss copy paste as new layer resize 45%.
Duplicate layer 5 times. Arrange across frame.
On Hearts layer 6 Image Mirror move back across to other side of frame.

Open Breathofangeldnscrapspiano2 copy paste as new layer arrange at bottom of frame.
Open your tube copy paste as new layer arrange on layer, add drop shadow.
Open Breathofangeldnscrapsbow2 copy paste as new layer resize 45%
Image Mirror arrange on side of frame.
Open MBW-Swanlake03 copy paste as new layer resize 30% Image Mirror
arrange on left of piano.Add drop shadow.
Open MBW-Swanlake04 copy paste as new layer resize 40% arrange on right of piano.
Add drop shadow.
Open Breathofangeldnscrapsfeathers copy paste as new layer resize 20% arrange on layer.
Open Breathofangeldnscrapslights2 copy paste as new layer resize 25% arrange on left of piano.
Add drop shadow.
Click on background layer Select All.
Open BreathofangeldnscrapsPaper6 copy paste into selection.
Apply mask merge merge group.Duplicate Image Mirror.


Add your Artist © and your name then crop.
This is only a guide and feel free to use any other element you wish.
Most of all have fun creating.


Written and copyrighted to Maree (aka Falcon) 22nd January 2012.


Saturday, January 21, 2012

Live To Ride ♥


My Tutorials are strictly my own creations,
if they resemble another it is purely coincidence.
This was written with the use of PSP X2.
You may create it any version of PSP.

Supplies Needed.

Scrap Live To Ride by Kim -Kim's Korner.
You can purchase it at Scrappindollars Here.

I'm using the artwork of ©Keith Garvery Currently available at PTE Here.
Please purchase a license to use his work.
I purchased my tube at MPT please feel free to choose your own if not available.

Font of choice.

Mask_324 by Weescotslass Here.

Open 750 X 750 transparent Image.

Open kk_LTR_Frame05 copy paste as new layer. Select Magic wand click inside frame.
Selections Modify Expand by 10.Open kk_LTR_Paper24 copy paste as new layer
resize 65% arrange over frame
Selections Inver-tap delete.Drag below frame layer.
Open kk_LTR_hearts copy paste as new layer arrange on top of frame
add light drop shadow.
Open kk_LTR_vest copy paste as new layer resize 38% arrange on lower right of frame.
Add drop shadow.
Open kk_LTR_banner copy paste as new layer arrange on top of frame add drop shadow.
Open kk_LTR_Bike02 copy paste as new layer arrange on left of frame, add drop shadow.
Open your tube arrange over bike then erase any parts you dont want showing.
I erased part of the leg so sjhe appears to be standing over it.
Give your tube a drop shadow.
Open kk_LTR_skull02 copy paste as new layer resize 35% arrange on top right of frame
.Add drop shadow.
Open kk_LTR_tag copy paste as new layer resize 32% arrange under banner .
Using your eraser brush remove part of the string, add drop shadow.
Open kk_LTR_makeup powder copy paste as new layer resize 35%
arrange at bottom of frame, add drop shadow.
Open kk_LTR_hat copy paste as new layer resize 42% arrange at front of bike wheel
add drop shadow.
Open kk_LTR_makeup lipstick copy paste as new layer resize 40% arrange
next to powder add drop shadow.
Open kk_LTR_Lips01 copy paste as new layer resize 45% arrange in center of frame. Add drop shadow.
Open kk_LTR_handcuffs copy paste as new layer resize 40% arrange nest to hearts.
Select your eraser brush carefully erase part of chain. Add drop shadow.
Open kk_LTR_star01 copy paste arrange left side of frame near banner.
Resize 32% add drop shadow the duplicate Image Mirror Flip.
Merge Merge visible then Adjust Sharpen Sharpen.Resize 85% all layers ticked.
Add new layer Layers Arrange Send to bottom. Select All.
Open kk_LTR_Paper28 copy paste into selection. Apply mask merge merge group.
Add new layer Layers Arrange Send to bottom. Select All.
Open kk_LTR_Paper11 copy paste into selection. Apply mask merge merge group.
Image FreeRotate 90 Right.

Add your Artist © and your name then crop.
This is only a guide and feel free to use any other element you wish.
Most of all have fun creating.


Written and copyrighted to Maree (aka Falcon) 21st January 2012.

Kissable ♥


My Tutorials are strictly my own creations,
if they resemble another it is purely coincidence.
This was written with the use of PSP X2.
You may create it any version of PSP.

Supplies Needed.

Scrap Kissable by Jens Sweet Temptations.You can purchase it at Scrappindollars Here.

I'm using the artwork of © Jose Cano.You must have a license to use this artwork.
Currently available at PTE Here.


Font of choice.

Mask_27 by Bev HorsePlay's Pasture Here.

Template_123 by Bev -HorsePlay's Pasture Here

Open Your template and delete the credit layer.

Select Rec 1a Selections Float Defloat open Paper 13 copy paste into selection.
Open your tube copy paste as new layer arrange on layer Selections-Invert-tap delete.

On your tube layer Select Blend Mode- Luminary(L) then lower Opacity to 46.
Select Rec 2a Selections Float Defloat open Paper14 copy paste into selection,
open your tube copy paste arrange. Selections Invert-tap delete.
Select Blend Mode Luminary(L) then lower Opacity to 62.

Select Rec 3a Selections Float Defloat open Paper12 copy paste into selection.
Open your tube copy paste as new layer arrange on layer add drop shadow.

Open Bling copy paste as new layer arrange on tube on Rec 1 duplicate Image Mirror
arrange to your liking.
Select Back Rectangle 2 Selections Float Defloat open Paper10 copy paste as new layer
resize 66% arrange Selections-Invert-tap Delete. Deselect.

Select Hearts layer Selections Float Defloat copy paste as new layer Paper9 resize 50%
arrange over hearts Selections Invert-tap Delete.

On these layers Back Rectangle 1 Rec 1 Rec 2 Rec 3,
I used the following Adjust-Add Noise-Uniform 100% tick box.
Open Bow2 copy paste as new layer resize 25% arrange on left
duplicate Image Mirror add drop shadow to both.

I add the following Elements copy paste as new layers.
Cupcake -35%
Envelope1 - 40%
love potion - 45%
Heart1 - 30%
Give all a drop shadow.
Open Flower1 copy paste as new layer below Envelope1 resize 35% add drop shadow then duplicate Image Mirror.
Click on background layer Select All copy paste into selection Paper10.
Apply mask merge merge group.

Add your Artist © and your name then crop.Adjust Sharpen.
This is only a guide and feel free to use any other element you wish.
Most of all have fun creating.


Written and copyrighted to Maree (aka Falcon) 21st January 2012.

Love Story ♥


My Tutorials are strictly my own creations,
if they resemble another it is purely coincidence.
This was written with the use of PSP X2.
You may create it any version of PSP.

Supplies Needed.

Scrap Love Story by Le paradis du Scrap.
You can purchase it at The Creativity Box Here.

I'm using the artwork of ©Anna Liwang.You must have a license to use this artwork.
Currently available at PSP Tubes Emporium Here.

Font of choice or the one I am using Delight Script.

Mask_340 by Weescotlass Here


Open 700 X 700 transparent Image.

Open LpdsF3 copy paste as new layer.Click inside frame with Magic Wand.
Modify Expand by 4.
Open LpdsP12 copy paste as new layer.Selections Invert-tap delete,
move below frame layer.
Open your closeup tube copy paste as new layer below frame layere,
arrange to your liking then tap delete.

Open LpsdE35 copy paste as new layer above paper layer resize 55% arrange to your liking.
Open LpsdE21 copy paste as new layer drag below paper layer, add drop shadow.
Open LpsdE13 copy paste as new layer resize 35% arrange at bottom of frame,
add drop shadow.
Open LpsdE29 copy paste as new layer resize 65% arrange on right of frame
add drop shadow.
Open LpsdE48 copy paste as new layer resize 25% arrange at bottom of frame,
add drop shadow.
Open LpsdE22 copy paste as new layer resize 20% arrange near envelope
add drop shadow.
Open LpsdE9 copy paste as new layer arrange at bottom of frame resize 35%
use your pick tool to arrange to your liking, add drop shadow.
Open LpsdE36 copy paste as new layer arrange next to heart resize 35%
add drop shadow.
Open LpsdE3 copy paste as new layer resize 65% arrange on left of layer,
add drop shadow.
Click on background layer Selections select all.
Open LpdsP6 copy paste into selection apply mask merge merge group.


Add your Artist © and your name then crop.
This is only a guide and feel free to use any other element you wish.
Most of all have fun creating.


Written and copyrighted to Maree (aka Falcon) 20th January 2012.

Wednesday, January 18, 2012

Forever In My Heart ♥


My Tutorials are strictly my own creations,
if they resemble another it is purely coincidence.
This was written with the use of PSP X2.
You may create it any version of PSP.

Supplies Needed.

Scrap Forever is only The Beginning by Jen -Sleek n Sassy Designz
You can purchase it at Scrappindollars.


I'm using the artwork of © Currently available at

Font of choice

Mask of Choice

Image is better to have larger to work with then we can crop and resize when completed.
Open 700 X 700 transparent Image.
Open FIOTB_Paper3 click on background layer Select all copy paste into selection paper.Apply

your mask merge merge group.Adjust Sharpen Unsharp Mask.
Open FIOTB_Element64 copy paste as new layer resize 75% add drop shadow.
Layers Arrange Send to

bottom. Duplicate arrange either side of mask on layer.
Open FIOTB_Element4 copy paste resize 85% arrange on right of mask.
Open your closeup tube copy paste as new layer resize as needed.Image Mirror,
arrange on lef tof layer.
Click on Blend Mode change to Lunimancy (L).
Open FIOTB_Element31 copy paste as new layer resize 90% arrange on layer add drop shadow.
Open FIOTB_Element40 copy paste as new layer resize 75% arrange on right of layer,
add drop shadow.
Open FIOTB_Element5 copy paste as new layer resize 70% arrange on layer, see tag.
Add drop shadow.
Open your main tube copy paste as new layer resize if needed add drop shadow.
Open FIOTB_Element30 copy passte as new layer resize 35%.Image Mirror
arrange on left of layer, add drop shadow.
Open FIOTB_Element29 copy paste as new layer resize 65% add drop shadow.
Duplicate Image MirrorImage flip arrange at bottom of tube.
Open FIOTB_Element17 copy paste as new layer resize 75%
add drop shadow arrange between theother two roses.
Open FIOTB_Element39 copy paste resize 55% arrange at top of layer.
Add drop shadow.

Add your Artist © and your name then crop.
This is only a guide and feel free to use any other element you wish.
Most of all have fun creating.


Written and copyrighted to Maree (aka Falcon) 17th January 2012.


Believe ♥


My Tutorials are strictly my own creations,
if they resemble another it is purely coincidence.
This was written with the use of PSP X2.
You may create it any version of PSP.

Supplies Needed.

Scrap Winter Wonderland by Conchi-DnScraps.
You can purchase it at Lollipopsngumdrops.

I'm using the artwork of ©Zlata_M Currently available at PFD.

Font of choice

Mask of Choice

Open new Image 700 x 700
open Window 2 copy paste as new layer resize 95% add light drop shadow.

Open Snow white tree2 copy paste as new layer below window layer.
Open Winterwonderland snowpuppet copy paste as new layer below window layer resize 50%. Image Mirror arrange on layer add drop shadow.
Open snow white branch copy paste as new layer above snowpuppet layer. Arrange on right of window.Using your Selection to delete any part outside the window frame.
Open Winterwonderland brad copy paste as new layer above window layer. Add drop shadow.
Arrange on left of window.
Add your tube of choice resize if needed add drop shadow. Arrange on left of layer.
Open Winterwonderlandcurlribbon copy paste as new layer resize 85% arrange in front of tube.Add drop shadow.
Open winderwonderlandsnow3 copy paste as new layer resize 32% arrange on layer.Add drop shadow.
Open winterwonderlandboot2 copy paste as new layer resize 40% duplicate arrange on layer. Add drop shadow.
Click on background layer Select All open winterwonderlandpaperdn3 copy paste into selection apply mask merge merge group.
Open winterwonderlandwordart copy paste as new layer resize 65% arrange at bottom of layer. Duplicate this twice.Rename B1,2,3.
Close out B2 and 3 Effects Xfeno-Constellation with these settings.


Add your Artist © and your name.
This is only a guide and feel free to use any other element you wish.
Most of all have fun creating.

Animation

Open Animation Shop then click back to Psp.
Close out B2 and 3 layers. Click on B1.
Edit Copy Special - Copy Merged.
Click into AS Paste as New Animation.
click into PSp closeout B1 open B2 Edit copy special copy merged.
Click into AS Edit paste After Current Frame. Repeat for B3.
Check your Animation is happy resize then save as Gif.

Written and copyrighted to Maree (aka Falcon) 17th January 2012.


Friday, January 6, 2012

Secret Escape ♥


My Tutorials are strictly my own creations,
if they resemble another it is purely coincidence.
This was written with the use of PSP X2.
You may create it any version of PSP.

Supplies Needed.

Scrap Secret Escape by Krissy's Scraps .You can purchase it at Exquisite Scraps.

I'm using the artwork of ©Suzane Woolcott Currently available at GorjussArt.

Font of choice or the one I am using Seasons Spring

Mask by Vaybs DBV _135 Here.

Image is better to have larger to work with then we can crop and resize when completed.
Open 700 X 700transparent Image.

Open KSSEFunky Frame 1 copy paste as new layer click inside with Magic wand.
Selections Modify Expand by 4. Add new layer.
Open KSSEPaper4 copy paste into selections on new layer. Deselect.Drag below frame layer.
Give your frame a drop shadow.
Open KSSE Cloud 2 copy paste as new layer below frame resize 60% arrange
on right add dropshadow.
Open KSSE Cloud 1 copy paste as new layer below frame resize 65%
arrange on left add drop shadow.
Open KSSE Sway Bridge1 copy paste below frame layer.Use your PickTool to fit frame.
Add dropshadow.
Open KSSE Sparkles1 copy paste as new layer resize 65%
arrange at top of frame, duplicate ImageMirror.
Open KSSEDandelion 1 copy paste as new layer resize 75%
Duplicate layer arrange the copy belowthe bridge layer.
Remove any stem outside the frame.
Open KSSEButterfly1 copy paste as new layer resize 45%
arrange in center of frame.Add dropshadow.
Open KSSENatural Bloom 2 copy paste as new layer resize 32%
arrange on bridge add drop shadow.
Open KSSEnatural Bloom 3 copy paste as new layer resize 30% FreeRotate 90Right
arrange next toother bloom. add drop shadow.
Open KSSEToad Stool 2 copy paste as new layer resize 35% arrange
bottom right corner of frame.Add drop shadow.
Open KSSESquirrel 1 copy paste as new layer resize 40% arrange on toad stool
add drop shadow.
Open KSSENatural Bloom 1 copy paste as new layer Image Mirror
arrange on side of frame, see tag. Add drop shadow.
Open KSSECushion 1 copy paste as new layer above frame layer resize 75%
arrange on left of frame.Add drop shadow.
Open KSSEBow2 copy paste as new layer resize 65%
arrange top center of frame, add drop shadow.
Open your tube copy paste as new layer arrange on left of frame.
Add drop shadow.
Open KSSEScattered Beads 1 copy paste above background layer
arrange at top of frame. ImageMirror add drop shadow.
Click on background layer Select All copy and paste into selection KSSEPaper8
Selectionsdeselect. Apply mask merge merge group.

Add your Artist © and your name then crop.
This is only a guide and feel free to use any other element you wish.
Most of all have fun creating.


Written and copyrighted to Maree (aka Falcon) 2012.


Miricale Of Love ♥


My Tutorials are strictly my own creations,
if they resemble another it is purely coincidence.
This was written with the use of PSP X2.
You may create it any version of PSP.

Supplies Needed.

Scrap: Jonathon Eark Bowser Package 1 by Cathy-Lady Hawwk Designs.
You can purchase it at CDO.

I'm using the artwork of ©Jonathon Earl Bowser Currently available at CDO.


Font of choice or the one I used Simply Glamorous

Mask by Vaybs DBV_80 Here

Image is better to have larger to work with then we can crop and resize when completed.
Open 700 X 700transparent Image.

Open LHDScraps_Bowser-Package1-frame1 copy paste as new layer resize 85% add drop shadow.
Click inside frame with Magic wand Selections Modify Expand by five.
Remember to click in all areas within the frame.
Open background tube and copy the lower part of Image- see picture.Copy image.


Click back on frame layer
Add new layer Edit copy paste into selection. Drag below frame layer.
Layers Merge-MergeDown.Give your frame a light drop shadow.
Open LHDScraps_Bowser-Package1-ele2 copy paste as new layer resize 85%.
Image FreeRotate 90Left then drag below frame layer,
add drop shadow.
Open LHDScraps_Bowser-Package1-ele1 copy paste as new layer below ele2 layer
add light drop shadow.
Open LHDScraps_Bowser-Package1-ele10 copy paste as new layer below ele1 layer Image FreeRotate90 Right. Resize 85% arrange behind ele1 add drop shadow.
Open LHDScraps_Bowser-Package1-ele27 copy paste as new layer resize 45%
arrange on layer add drop shadow.
Open LHDScraps_Bowser-Package1-ele6 copy paste as new layer arrange on layer.
Open LHDScraps_Bowser-Package1-ele41 copy paste as new layer arrange in
center of layer resize 85% add drop shadow.
Open LHDScraps_Bowser-Package1-ele35 copy paste as new layer
arrange at bottom of frame. Resize70% add drop shadow.
Open your main tube copy and paste as new layer arange
on left of frame add drop shadow.
Open LHDScraps_Bowser-Package1-ele9 copy paste as new layer
below tube layer arrange to left of layer see tag, add drop shadow.
Open LHDScraps_Bowser-Package1-ele3 copy paste as new laye
r resize 65% arrange on layer adddrop shadow.
Open LHDScraps_Bowser-Package1-ele22 copy paste as new layer resize75
arrange at bottom oflayer. Duplicate
Image resize 65% arrange on left. Give both a drop shadow.
Open LHDScraps_Bowser-Package1-ele25 copy paste as new layer arrange
between ele25. Resize 85% add light drop shadow.
Open LHDScraps_Bowser-Package1-ele40copy paste as new layer above background layer.DuplicateImage Mirror.FreeRotate 20 right then 20 Left on duplicated layer
arrange on layer.
Open LHDScraps_Bowser-Package1-paper1 copy paste into selection
apply mask merge merge group.

Add your Artist © and your name then crop.
This is only a guide and feel free to use any other element you wish.
Most of all have fun creating.


Written and copyrighted to Maree (aka Falcon) 2012.

Babes @ Work


My Tutorials are strictly my own creations,
if they resemble another it is purely coincidence.
This was written with the use of PSP X2.
You may create it any version of PSP.

Supplies Needed.

Scrap Cookie at Work by ShellS Scraps.You can purchase it at Exquisite Scraps.
Thanks Shell for this great kit...

I'm using the artwork of ©Krissy Imaging Currently available at Exquisite Scraps

Font of choice or the ones I used Tables and Water Street

Mask by Vaybs DBV_104 Here

Image is better to have larger to work with then we can crop and resize when completed.
Open 700 X 700transparent Image.

Open frame 1 copy paste as new layer resize 65% arrange on top right add drop shadow.
click inside frame with Magic Wand Selections Modify Expand by 4.
Open paper8 copy paste as new layer resize 65% arrange over frame.
Selections Invert tap delete. Move paper below frame layer.
Open office1 copy paste as new layer resize 35%
arrange under frame add drop shadow.
Open Crane1 copy paste as new layer resize 30%
arrange under frame at bottom.Add drop shadow.
open workman1 copy paste as new layer resize 45% arrange in front
of frame on right, add drop shadow.
Open barrier 1 copy paste as new layer resize 40% arrange on layer
add drop shadow.
Open sign 1 copy paste as new layer arrange on left of frame.
Click on Pick Tool holding down Shift key click on bottom left corner
bring it up gradually toyou have sign at angle.
resize 65% arrange on left of frame, see tag add drop shadow.
Open crate1 copy paste as new layer resize 45% arrange on left of layer.
Add drop shadow.
Open chair1 copy paste as new layer resize 55% arrange on layer,
add drop shadow.
Open backpack1 copy paste as new layer resize 20% arrange near chair
add drop shadow.
Open cone1 copy paste as new layer arrange in front of barrier resize 20%
add drop shadow. Duplicate arrange on other side of barrier.
Open dog1 copy paste as new layer arrange in front of barrier resize 25%
add drop shadow.
Open KrissysImaging CookieAtWork3 & 4 PU copy paste as new layers
arrange on layer to yourliking. Give both a drop shadow.
Click on your background layer Selections Select all copy paste into selection paper7
applymask merge merge group.
open new Image 200 x 200 FG #000000 BG ff0000 using the Preset Tools
draw out a small triangle,convert to raster add drop shadow.
Then change your FG:#000000 BG:ffff00
Select Tables font size 72 hit the letter 'W' draw out to match size of red triangle,
convert to raster add drop shadow.
Copy paste onto your tag arrange to your liking.
Select Font Water Street FG:#ffff00 BG:000000 Stroke 2 type your name
convert to raster add drop shadow arrange next to symbol you created.


Add your Artist © then crop and save as png or jpg.
This is only a guide and feel free to use any other element you wish.
Most of all have fun creating.


Written and copyrighted to Maree (aka Falcon) 2012.


Friday, December 30, 2011

Welcome Winter ♥


My Tutorials are strictly my own creations,
if they resemble another it is purely coincidence.
This was written with the use of PSP X2.
You may create it any version of PSP.

Supplies Needed.

Scrap Welcome Winter by Crystals Creations.You can purchase it at Exquisite Scraps.

I'm using the artwork of ©Suzanne Woolcott.
Currently available at GorjussArt.

Font:

Mask by Bev HorsePlay's Pastures HPP_14 Here

Image is better to have larger to work with then we can crop and resize when completed.
Open 700 X 700transparent Image.

Open ww_ee35 copy paste as new layer resiz e 65% then duplicate twice.
Arrange frames as I have rename them F1 F2 F3.Closeout background layer Merge Merge layers.
Click inside each frame with Magic Wand Selections Modify Expand by 4.
Open ww_pp2 copy paste as new layer arrange to your liking over frames. Selections Invert hit Delete move below frame layer.
Open ww_ee17 copy paste as new layer resize 35% duplicate twice arrange under each frame, see tag.
Open ww_ee26 copy paste as new layer arrange in frame 1 resize as needed to fit add drop shadow.
Open ww_ee19 copy paste as new layer arrange in frame 2 resize as needed to fit add drop shadow.
Open ww_ee36 copy paste as new layer arrange in frame 3 resize as needed to fit add drop shadow.
Open ww_ee23 copy paste as new layer arrange on right of frame 2 resize as needed add drop shadow.
Open your main tube copy paste as new layer arrange on left of layer add drop shadow.
Open ww_ee14 copy paste as new layer above background layer arrange on right of layer, see tag add drop shadow.
Open ww_ee21 copy paste as new layer above bacground layer resize 85%. Duplicate Image Mirror Flip. Add drop shadow.
Click on background layer Selections Select All.
Open ww_pp1 copy paste into selection, deselect. Apply mask merge merge group.


Add your Artist © and your name then crop.
This is only a guide and feel free to use any other element you wish.
Most of all have fun creating.


Written and copyrighted to Maree (aka Falcon) 2011.

Winter Blues ♥


My Tutorials are strictly my own creations,
if they resemble another it is purely coincidence.
This was written with the use of PSP X2.
You may create it any version of PSP.

Supplies Needed.

Scrap Winter Blues by Gina - KiKeKa Kits.You can purchase it at Exquisite Scraps.

I'm using the artwork of ©Jennifer Janesko Currently available at CDO

Font:

Mask by Bevie HorsePlays Pastures HPP_11 Here

Image is better to have larger to work with then we can crop and resize when completed.
Open 700 X 700transparent Image.

New layer select All
Open cbg_winterblues_paper06 copy paste into selection.Deselect apply mask merge group.
Open cbg_winterblues_frames01 copy paste as new layer.With Magic wand click inside frame.
Selections Modify Expand by 4 open cbg_winterblues_paper02 copy paste as new layer resize 65%
Selections Invert hit Delete deselect move below frame layer.Add drop shadow.
Add your tube of choice now resize if needed add drop shadow.
Open cbg_winterblues_tree01 copy paste as new layer below tube layer arrange on right of frame.Add drop shadow.
Open cbg_winterblues_leaves04 copy paste as new layer above frame layer. Resize 60% arrange on left of frame.
Open cbg_winterblues_flower02 copy paste as new layer arrange on left of frame add drop shadow.
Open cbg_winterblues_candles01 copy paste as new layer arrange on left of frame resize 85% add drop shadow.
Open cbg_winterblues_ribbon copy paste as new layer arrange in front of candles resize 90% add drop shadow.
Open cbg_winterblues_flowers03 copy paste as new layer arrange in front of ribbon resize 85% add drop shadow.

Add your Artist © and your name then crop.
This is only a guide and feel free to use any other element you wish.
Most of all have fun creating.


Written and copyrighted to Maree (aka Falcon) 2011.

Monday, December 26, 2011

Elegant Celebrations♥


My Tutorials are strictly my own creations,
if they resemble another it is purely coincidence.
This was written with the use of PSP X2.
You may create it any version of PSP.
Supplies Needed.

Scrap Elegant New Year by Jen-SleeknSassy Designz.
You can purchase it at Scrappin Dollars.

I'm using the artwork of ©Ray Leaning Currently available at PTE
or you can select your own tube/s.
I have created this tag using MPT tube license.

Font of choice or the one I used NewUnicodeFont.

Mask of choice. The one I used is by Babes Design mask 15
Sorry unable to supply mask as her site has been moved.

Image is better to have larger to work with then we can crop and resize when completed.
Open 700 X 700transparent Image.

Selections-Select All open paper3 copy paste into selection apply mask merge merge group.
Open Frame2 copy paste as new layer resize 75% add drop shadow.
Open Streamers copy paste below frame layer resize 35% duplicate twice arrange at back of frame then add drop shadow to all.
Open Fireworks copy paste as new layer resize 45% arrange on left of frame
then duplicate Image Mirror.
Open Fireworks2 copy paste as new layer resize 40% arrange in center of frame.
Open Hat3 copy paste as new layer resize 32% arrange on bottom corner of frame add drop shadow, Image FreeRotate 23 Right.
Open Clock 6 copy paste as new layer below frame. Resize 65% arrange to your
liking add drop shadow.
Open your tube or tubes arrange on frame resize if needed add drop shadow.
Open Balloon2 copy paste as new layer resize 40% arrange on right of frame
add drop shadow.
Open Balloon copy paste as new layer resize 35% arrange on left of other balloon
add drop shadow.
Open Chanpagne Glass2 copy paste as new layer resize 32% arrange in front of your tube
I duplicated glass twice arrange one in tube hand see tag and the
other next to champagne bottle.
Give all a drop shadow.


Add your Artist © and your name then crop.
This is only a guide and feel free to use any other element you wish.
Most of all have fun creating.


Written and copyrighted to Maree (aka Falcon) 2011.

Happy New Year♥


My Tutorials are strictly my own creations,
if they resemble another it is purely coincidence.
This was written with the use of PSP X2.
You may create it any version of PSP.
Supplies Needed.

Scrap Happy New Year by Niqui's Designs.You can purchase it at Exquisite Scraps.

I'm using the artwork of ©Elias Chatzoudis Currently available at PTE
I purchased this tube at MPT and using the relevant license.

Font of choice or the one I used Delight Script

Mask of choice or the I used lrmask166 Here.

Image is better to have larger to work with then we can crop and resize when completed.

Open 600 X 600 transparent .

Click on background layer then Selections Select All.

Open Paper3 copy paste into selection deselect apply mask merge merge group.
Open NQ-New Years Firework 2 copy paste as new layer arrange on top left of layer
. Duplicate Image Mirror.
Open NQ-Sparkels2 copy paste as new layer. Duplicate Image Flip Mirror
arrange in center of layer.
Open NQ-Sparkles copy paste as new layer arrange at top of layer add drop shadow.
Open NQ-Sparkles1 copy paste as new layer arrange at top of layer resize 75%,
add drop shadow.
Open NQ-Musical Notes copy paste as new layer arrange at top of layer, see tag.
Open your tube/s copy paste as new layers arrange to your liking add drop shadow.
Resize if needed.
Open NQ-Fan1 copy paste as new layer arrange at bottom of tube/s resize 65%
add drop shadow.Duplicate Image Mirror arrange on layer.
Open NQ-New Years Eve Mask copy paste as new layer resize 45%
arrange on right of layer add drop shadow.
Open NQ-New Years Hat4 copy paste as new layer resize 35% arrange on left of layer
add drop shadow.
Open NQ-Blow Pipe 1 copy paste as new layer resize 28% arrange next to hat
add drop shadow.
Open NQ-New Years Cupcake copy paste as new layer resize 22% arrange next to mas
k add drop shadow.
Open NQ-Bottle Champagne copy paste as new layer resize 45% arrange in center of
layer add drop shadow.
Open NQ-Champagne Glass copy paste as new layer resize 35% arrange next to bottle
add drop shadow.


Add your Artist © and your name.

This is only a guide and feel free to use any other element you wish.
Most of all have fun creating.


Written and copyrighted to Maree (aka Falcon) 2011.

Celebrate 2012♥


My Tutorials are strictly my own creations,
if they resemble another it is purely coincidence.
This was written with the use of PSP X2.
You may create it any version of PSP.

Supplies Needed.

Scrap Celebrate 2012 by Niqui's Designs.You can purchase it at Exquisite Scraps.

I'm using the artwork of © Keith Garvery Currently available at PTE.
I purchased this tube at MPT and using the relevant license.

Font of choice or the one I used Brush455 BT

Image is better to have larger to work with then we can crop and resize when completed.
Open 700 X 700transparent Image.

Select PreSet Tool-Ellispe BG#000000 or select a paper I used NQ-Paper5.

Draw a large circle then using your Text Tool type HAPPY NEW YEAR
around the outsidecircle.Then convert to a raster layer.
Open NQ-Beats copy paste as new layer arrange at top of circle. Add drop shadow.
Open NQ-Fireworks3 copy paste as new layer duplicate arrange on layer.
Add drop shadow to both.
Open NQ-Fireworks2 copy paste as new layer dulicate arrange on layer
add drop shadow to both.
Open NQ-Balloons1 copy paste as new layer duplicate arrange 1 set at top center
of circle, theother to the right of layer add drop shadow to both.
Add your main tube now and resize if needed then add drop shadow.
Arrange to your liking.
Open NQ-Party Blower copy paste as new layer resize 35% Image Mirror
move to bottom of tube add drop shadow.
Open NQ-Champagne bottle & Ice Bucket copy paste as new layer resize 65% arrange next to party blower, add drop shadow.
Open NQ-Champagne Glass copy paste as new layer resize 45%
arrange on left of tube add drop shadow.
Open NQ-New Year Bag copy paste as new layer resize 35%
arrange on layer add drop shadow.
Open NQ-2012 copy paste as new layer resize 65% arrange in front of tube
add drop shadow.

Add your Artist © and your name then crop.
This is only a guide and feel free to use any other element you wish.
Most of all have fun creating.


Written and copyrighted to Maree (aka Falcon) 2011.

Saturday, December 17, 2011

Cheetah-Licious Xmas♥


Cheetah-Licious Xmas

My Tutorials are strictly my own creations,
if they resemble another it is purely coincidence.
This was written with the use of PSP X2.
You may create it any version of PSP.

Supplies Needed.
I am using the Scrap kit Cheetah-licious Christmas by Judith
.It is available at Scrapz-N-Stuff.

I'm using the artwork of ©LIELMAN Currently available at PFD.
Font of choice or the one I am using Tonight's the Night

Mask by Weescotlass wsl_84 Here.

Image is better to have larger to work with then we can crop and resize when completed.
Open 700 X 700transparent Image.

Open JF_Cheetah-licious Christmas_Frame_06 copy paste as new layer r
esize by 30% add drop shadow.Click inside with Magic wand Selections Modify Expand by 4.
Open JF_Cheetah-licious Christmas_Paper_02 copy paste as new layer resize 40% arrange over frame Selections Invert hit Delete, move below frame layer.
Open JF_Cheetah-licious Christmas_Element_68 copy paste below frame layer.
Open JF_Cheetah-licious Christmas_Element_37 copy paste below frame layer.
Resize 45% arrange on left add drop shadow.
Open JF_Cheetah-licious Christmas_Element_11 copy paste as new layer
resize 35% arrange on left of frame.Add drop shadow.
Open JF_Cheetah-licious Christmas_Element_10 copy paste as new laye
r resize 30% arrange above other ribbon. add drop shadow.
Open JF_Cheetah-licious Christmas_Element_51 copy paste as new layer
resize 25% arrange on top of frame at left. Add drop shadow.
Open JF_Cheetah-licious Christmas_element_66 copy paste as new layer
resize 20% arange at bottom of frame left corner add drop shadow.
Open JF_Cheetah-licious Christmas_Element_05 copy paste as new layer
resize 32% add drop shadow. Duplicate arrange on button.
Open JF_Cheetah-licious Christmas_Element_06 copy paste as new layer
resize 30% add drop shadow arrange in front of other flowers.
Open JF_Cheetah-licious Christmas_Element_46 copy paste as new layer
resize 7% add drop shadow arrange at bottom of button, see tag.
Open your tube copy paste as new layer resize if needed add drop shadow
arrange on layer to your liking.
Open JF_Cheetah-licious Christmas_Element_71 copy paste as new layer
resize 20% add drop shadow arrange on right of layer.
Open JF_Cheetah-licious Christmas_Element_41 copy paste as new layer
resize 25% arrange on layer to right add drop shadow.
Open JF_Cheetah-licious Christmas_Element_39 copy paste as new layer
resize 28% arrange on layer add drop shadow.
Open JF_Cheetah-licious Christmas_Element_42 copy paste as new layer
resize 30% arrange on layer add drop shadow.
Open JF_Cheetah-licious Christmas_Element_44 copy paste as new layer
resize 20% arrange on layer add drop shadow.

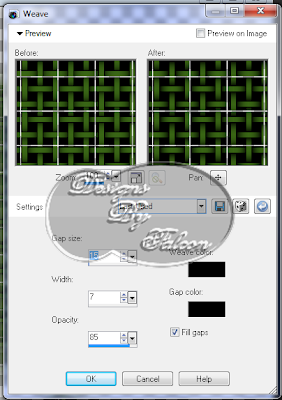
New layer open JF_Cheetah-licious Christmas_Paper_07 Effects Texture Effects
Weave using these settings
Apply mask to layer Merge merge group.
Select your Select tool using these settings



Outline the lines on the mask vertical and horizontal to do this keep
the shift key downwhen selecting each line.


When you have completed this we will duplicate the layer twice you now
3 mask layers. Rename them Maks 1-2-3.

Click on Mask 1 layer Effect-Plugins-Xfeno2 Constellation using these settings
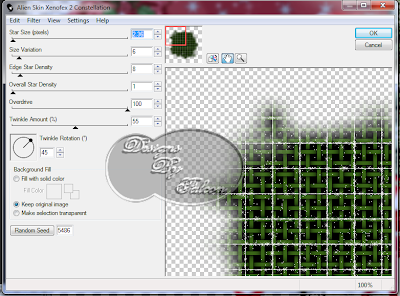

Click on Mask 2 layer repeat above this time hit the Random Button once.
Repeat again for Maks 3 layer.

Add your Artist © and your name.
I used BG:000000 Tonight's the Night 48 add drop shadow 2-2-50-5 white.
Eye Candy-Nature-I used Text 100 Light Dusting click Ok arrange name on layer.

This is only a guide and feel free to use any other element you wish.
Most of all have fun creating.

Animation Shop

Open your Animation shop select on your Propagate Paste button.Click back to Psp.
Close out your mask layers click on paper layer.Layers Merge Merge visible.Edit copy.
Click on Animation shop Edit-Paste-As New Animation.Minimize for now.
Click back to Psp closeout mask 1 open Mask 2 Edit Copy.
Click on AS click on mask1 Edit Past-After current frame.
Repeat this for Mask 3 layer.
Maximize your Merged layer Edit Copy. Click on frame 1 Edit Select All Edit
paste Into Selected Frame.Hold the button down when your happy
with placement let button go.

Remember the Undo key is your friend.
Resize if needed or crop.


Written and copyrighted to Maree (aka Falcon) December 2011.

Saturday, December 10, 2011

A Very Panda Christmas ♥


My Tutorials are strictly my own creations,
if they resemble another it is purely coincidence.
This was written with the use of PSP X2.
You may create it any version of PSP.

Supplies Needed.

Scrap Christmas Panda created by Judith of Scrapz N Stuff.
You can purchase it at ScrapzNStuff.

Art work by Orkusart. Remember to purchase a license to use this art work.
You can purchase tube from PFD .

Font:2Peas Gone Postal

Mask by Bev HorsePlays Pastures HPP_11 Here.


Image is better to have larger to work with then we can crop and resize when completed.
Open 900 X 700transparent Image.Kit is a Full sized so we are going to be resizing some.


Open JF_ChristmasPanda_Frame_11 copy paste as new layer Image FreeRotate 90 Left. Resize 35%.
With Magic wand click inside frame Selections Moidfy Expand by 4.

New layer open JF_ChristmasPanda_Paper_15 copy paste into Selection.

Adjust Hue & Saturation

using these setting change the color to blue.


Deselect drag under frame layer.Give your frame a light Drop Shadow.

Open JF_ChristmasPanda_Elements_61,64 66 67 copy and paste them as new layers
resize each layer 9% arrange them at top of frame
add drop shadow to each layer.

Open JF_ChristmasPanda_Element_21 copy paste as new layer resize by 25
arrange on right of layer.Add drop shadow.
Open JF_ChristmasPanda_Element_89 copy paste as new layer use the Pick tool to fit
frame arrange in center of frame. Add drop shadow.

Open JF_ChristmasPanda_Element 04 and 05 copy paste as new layers
below window layer. Resize to suite add a drop shadow to each layer.
Open JF_ChristmasPanda_Element_109 copy paste as new layer resize 18%
place near tree add drop shadow.
Open JF_ChristmasPanda_Element_97 copy paste as new layer resize 16%
arrange on layer add drop shadow.
Open JF_ChristmasPanda_Element_99 copy paste as new layer resize 16%
arrange on layer add drop shadow.
Open JF_ChristmasPanda_Element_118 copy paste as new layer resize 14%
arrange on layer add drop shadow.
Add your tube resize if needed add drop shadow.
New layer Select All open JF_ChristmasPanda_Paper_05 copy paste into selection.
Apply mask Merge Merge group.
New layer Select All open JF_ChristmasPanda_Paper_13 copy paste into selection.
Apply mask Merge Merge group.

Add your Artist © and your name then crop.
This is only a guide and feel free to use any other element you wish.
Most of all have fun creating.


Written and copyrighted to Maree (aka Falcon) December2011.

Joy Of Giving ♥


My Tutorials are strictly my own creations,
if they resemble another it is purely coincidence.
This was written with the use of PSP X2.
You may create it any version of PSP.

Supplies Needed.

Scrap Holly and The Berries is No Longer Available.
You may use any kit to recreate this tag.

Art work of ©Keith Garvey . Remember to purchase a license to use this art work.
You can purchase his tube/s from PTE .

Font of Choice or the one I used Base Christmas

Mask by Dee's Depot Design DD_17 Here


Image is better to have larger to work with then we can crop and resize when completed.
Open 700 X 700transparent Image.

Open DD_HATB_Paper3 copy paste as new layer apply mask merge merge group.
Open DD_HATB_Flower copy paste as new layer add drop shadow.
Open DD_HATB_TreeDecoration copy paste as new layer resize arrange on left of layer.
Add dropshadow.
Open DD_HATB_CandyCaneBow1 copy paste as new layer resize arrange on tree add drop shadow thenduplicate arrange.
Open DD_HATB_Gift 4 copy paste as new layer arrange on right of layer resiz
add drop shadow.
Open DD_HATB_Ponsietta 4 copy paste resize arrange at top of flower.
Add drop shadow.
Open DD_HATB_Stocking2 copy paste arrange on tree resize Image mirror.
Add drop shadow.
Open DD_HATB_Star copy paste arrange on top of stocking resize
add drop shadow.
Open your tube of choice or the one I am using arrange on layer resize if needed
add dropshadow.
Open DD_HATB_Gift2 copy paste as new layer resize arrange in front of tube
add drop shadow.
Open DD_HATB_Gift 1 coypaste as new layer resize arrange next to other gift
add drop shadow.
Open DD_HATB_Bauble 1 copy paste as new layer resize arrange on right side of flower
add drop shadow.
Open DD_HATB_Bauble 2 copy paste as new layer resize arrange on right side of flower
Image Mirror. Add drop shadow.
Open DD_HATB_Tag copy paste as new layer resize arrange at bottom of layer
in front of giftsadd drop shadow.
Open DD_HATB_Joy WordArt1 copy paste as new layer resize arrange at top of layer
to the left add drop shadow.
Open DD_HATB_Bell2 copy pasteas new layer resize place at bottom of letter O using your Erasertool erase part of the ring.
This will give the effect its hanging on the wordart.Add drop shadow.

Add your Artist © and your name then crop.
This is only a guide and feel free to use any other element you wish.
Most of all have fun creating.


Written and copyrighted to Maree (aka Falcon) December 2011.


Welcome Santa ♥


My Tutorials are strictly my own creations,
if they resemble another it is purely coincidence.
This was written with the use of PSP X2.
You may create it any version of PSP.

Supplies Needed.

Scrap Welcome Santa by Kesha - KnC Scrapz .
You can purchase it at Lollipops N Gumdrops..

Art work ©Kirsche . Remember to purchase a license to use this art work.
You can purchase tube from PFD

Font:Of Choice

Mask by Bevie - HorsePlays Pastures HPP_27 Here.

Image is better to have larger to work with then we can crop and resize when completed.
Open 700 X 700transparent Image.


Open frame copy paste as new layer. click inside with Magic wand.
Selections Modify Expand by 4.
Open pp10 copy paste as new layer Selections Invert hit delete move below frame layer
Add drop shadow to frame.
Open Pearl frame copy paste as new layer arrange on frame.Add drop shadow.
Open Element1 copy paste as new layer resize 105% arrange on frame add drop shadow.
Open frame 2 copy paste as new layer arrange over Click inside frame2 with magic wand.
New layer copy and paste into selection your closeup tube.Lower the Opacity to 65.
Open element6 copy paste as new layer resize65% arrange on layer add drop shadow.
Open bowribbon1 copy paste as new layer resize 85% arrange on top right of layer.
Add dropshadow.
Open birdhouse copy paste as new layer resize 55% arrange on right add drop shadow.
Open wssign copy paste as new layer resize 45% arrange on layer add drop shadow.
Open bear copy paste as new layer resize 42% arrange on layer add drop shadow.
With Selection tool draw out rectangle shape on bear arm. see diagram.


Hit Delete you should now be able to see pole.

Add your main tube arrange on left of layer resize if needed than add drop shadow.
Open stars copy paste as new layer resiz e85% duplicate Image Mirror

New layer FG:#ece8da BG#a4321a then find the forground Gradient floodfill
then apply mask merge merge group.


Add your Artist © and your name then crop.
This is only a guide and feel free to use any other element you wish.
Most of all have fun creating.


Written and copyrighted to Maree (aka Falcon) December 2011.