
Supplies Needed
I'm using the artwork of © Ismael Rac, you find it Here
Scrap kit by Pink Candy Designs called St Patrick's Day Here
Font: LD Shamrock
Drop Shadow of choice.
Mask_27 by HorsePlays Pastures Here
Remember to Save Often!!!
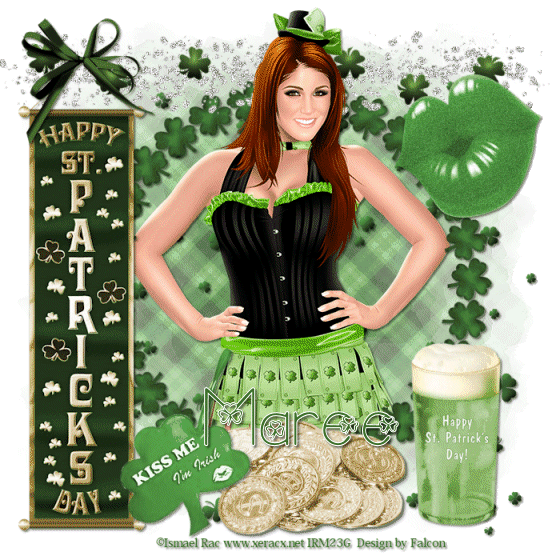
Let's create
Open new image 650 x 650 floodfill with #ffffff.
New layer select all, open pp5 paste into selection, apply mask/merge/merge group.
Open clovers element paste above mask layer.
Open frame 2 copy/paste, resize if needed.
Open your tube and place under frame then using your Selection tool
outline the head of tube, righ click,Promote selection to layer,
move this above frame.
Open gold element resize 65% move to bottom of frme.
Open decor element place above coins.
Open glittertrail element paste above frame.
Open beer element resize 65% X 2, place on right side of frame.
Open lips element rise 85% move to right top of frame.
Open banner element move to left of layer, see tag.
OPen bow element resize 39% move above banner.
Click on lip layer duplicate twice remane L1,L2 L3 then
Effect dbs flux with these settings:

On layer L2 change to 20 hit mix button once then
on L3 change to 25 hit mix twice.
Give a Drop Shadow to all except your glitterrail and mask layers
Add your Artist © and your name then crop and save.
This is only a guide and feel free to use any other element you wish.
Most of all have fun creating.
Animation.
Open Animation then click into Psp.
In Psp click on L1 close out L2 & L3, Edit/copy special /copy merged, click into AS
Paste as new animation.
In Psp close out L1 open L2 make sure you are on this layer then repeat above.
Repeat above remembering to close out the last layer till all 3 are pasted into As.
Check your animation if happy save as a Gif
Email me your creation, so I can show off your creations on my blog.
Thank you for using my tutorial.
Written by © Maree (aka Falcon) on 27th February 2011
Any similarities to this tutorial are purely coincidental
No comments:
Post a Comment