Sunday, May 29, 2011

Emo Craze ♥


For this Tutorial you will need.

A Tube of your choice I am using the awesome artwork of ©Verymany ,
which you must have a license to use you can get one at PFD.
* Please note that I purchased my tube from *
Elements and Papers are from a scrap kit called EMO_Crazy by Jane *JTs Design* you can purchase it Here.
Font: Halo Handletter.
Drop Shadow of choice.
Mask *Horseplays Pastures*, it's #HPP16 you can download it Here
Remember to Save Often!!!

Let's create

Open new image700 x700.
Select JTD_EC_Cluster resize 75% click inside frame with
Magic wand/selections/Modify/Expand by 8 copy paste close up tubes of choice.
Deselect move below frame. Change Blend Mode to Luminance (L) on tube layer.
Close out background layer/Layers/Merge/Merge group.
Select JTD_EC_Doodle2/move to right of layer/add drop shadow/duplicate/Image/Mirror.
Select JTD_EC_Tag1 resize 65% move below frame, add drop shadow.
Select JTD_EC_Bow8 position on loop on side of frame, add drop shadow/duplicate/Image/Mirror.
Select JTD_EC_Moon resize 85% move to top right of layer.
Add your main tube position on frame, add drop shadow.
Select JTD_EC_Rose1 resize 25% then using your Pick Tool position on right of frame.
Select JTD_EC_ Butterfly2 resize 30% position above ,rose add drop shadow.
Select JTD_EC_Hearts place on left of layer, add drop shadow.
Select JTD_EC_WordArt1 resize to fit on Tag1, position, add drop shadow.

New layer/select all/copy paste into selection JTD_EC_Paper20 apply mask/
merge/merge group/resize 85%.

New layer select all/copy paste into selection JTD_EC_Paper19/deselect/apply mask/merge/merge group.Adjust/Blur/Guassian blur-50.
Click on background layer I used background color from my tube
or select one of your own.
Add your Artist © and your name.If you wish to animate please continue.
This is only a guide and feel free to use any other element you wish.
Most of all have fun creating.

Animation.

Open Animation Shop then click back into Psp.
Click on background layer then using Xfeno Constellation using these settings:


Edit/Copy special/copy merged, click into AS paste as new animation.
Repeat this again this time click the Random button/click into AS/ paste after current frame.
Repeat above again this will give you 3 frames. Check your animation, if happy save as a Gif.

Email me your creation and I will place it on my show off Blog Page.
Thank you for using my tutorial.


Written and copyrighted to Maree (aka Falcon) on 30th May 2011.


Any similarities to this tutorial are purely coincidental.

Sunday, May 22, 2011

Girl Rockers ♥


For this Tutorial you will need.

A Tube of your choice I am using the awesome artwork of ©Lix ,
which you must have a license to use you can get one at PTE.

Elements and Papers are from a scrap kit called Rocker Girl by *Connie's Creative Chaos * you can purchase it Here.
Font: Metalic Avacodo
Drop Shadow of choice.
Remember to Save Often!!!

Let's create

Open new image 700 x 700.
Select Journal Template1 paste resize50%/add drop shadow.
Effects/Illumination/apply these settings:


Select GirlzRock paste/resize 45%/apply these settings using
EyeCandy-Gradient Glow:

Then add drop shadow.
Select DrumsWild paste resize 43% move to lower part of layer/
add drop shadow.
Select Rocker BooBoo paste resize 28% move position on drums/
add drop shadow.
Select Hearpink3 paste position on right of layer resize 65%/
add drop shadow.
Select HeartBlue2 resize 19% position on left of layer/
add drop shadow.
Open Preset Tool/Shapes/Star3/Width 10. I used FG:6ca4cc/BG:
ff80ff then find the Forground Gradient.
Draw out a good size star/add drop shadow.Click inside star with Magic Wand.
Selections/Modify/Expand by4 copy paste Rockpaper8.
Selections/Invert/Delete/move below star layer.

Add your tube/s add drop shadow.

Add your Artist © and your name then crop and save if you dont wish to Animate.
This is only a guide and feel free to use any other element you wish.
Most of all have fun creating.

Animation

Open your animation shop then click back to Psp.
Select star layer apply these settings:Adjust/Add Noise-50.
Edit/Copy special/copy merged paste as new animation in AS.

Back in Psp click undo then repeat above this twice more using 55 then 60.
Check your animation if happy save as a Gif.

If you wish to show off your creations.Email me your creation and I will place it
on my show off Page. Thank you for using my tutorial.


Written and copyrighted to Maree (aka Falcon) on 22nd May 2011.
Under no uncertain terms are you allowed to make money from anything
produced from this tut, this is against my TOU's.

Any similarities to this tutorial are purely coincidental.

Saturday, May 21, 2011

Spring Beauties ♥


For this Tutorial you will need.

A Tube of your choice I am using the awesome artwork of ©Caron Vinson ,
which you must have a license to use you can get one at CDO

Elements and Papers are from a scrap kit called Spring Thing by *Wacky Winnie Designz* you can purchase it Here.

Font: Kristen ITC
Drop Shadow of choice.

Mask *HorsePlays Pastures*, it's #14 you can download it Here
Remeber to leave some love!!

Remember to Save Often!!!
Let's create

Open new image 700 x700 floodfill background with #ffffff.

Select wwwDTriple Frame2 resize 65%/click inside each frame with Magic
wand/selections/Modify/Expand by 4 paste WWWDPaper11 resize by
75%/Selections/Invert/Delete/Move below frame layer/
add drop shadow to your frame.
I used 3 closeup tubes/placing them in frames then hit Delete/
move below frame/add drop shadow
to your tubes.Add your main tube position on top of frame/add drop shadow.
Select WWWDRibbon 1 resize 36%/add drop shadow position on corner of frame
then duplicate/Imag/Mirror.

Select WWWDBeadString1 resize 35% place on left of frame/
add drop shadow.
Select WWWDFlowerSpray2 resize 38% move to bottom of frame/position/
add drop shadow.
Select WWWDBlossom2 resize 75&/Image/Mirror/position on right of frame.
Select WWWDCallaLilies1 resize 45% place above blossoms on right of frame
add drop shadow.
Select WWWDButterfly1 resize 32% move to top of blossoms
/add drop shadow/duplicate/position at bottom of frame.
Select WWWDPaper12/apply mask/merge group.Effects/Exfeno2/Flag
with these settings:


Duplicate layer/Image/Mirror.Rename layers F1/F2.
Select WWWDPaper6 apply mask to layer then Adjust/Blur/Gaussian Blur 50.
Add your Artist © and your name.
If you wish to Animate please continue, if not save now.
This is only a guide and feel free to use any other element you wish.
Most of all have fun creating.
Now to Animate the Tag.

Open Animation Shop.

Click into Psp click on your flag1 layer then apply these setting with
Exfeno-Constellation/apply to both Flag layers.


Edit/copy special/Copy Merged click into AS Paste as new animation.

Back in Psp click undo on both layers reapply Constellation this time
hitting the Random Seed button once.

Edit/copy special/Copy Merged click into AS Paste after current frame.
Repeat above again for 3rd frame.Check your animation then save as a Gif.

If you wish to show off your creations.Email me your creation and I will place it
on my show off Page. Thank you for using my tutorial.


Written and copyrighted to Maree (aka Falcon) on 21 May 2011.
Under no uncertain terms are you allowed to make money from
anything produced from this tut, this is against my TOU's.

Any similarities to this tutorial are purely coincidental.

Thursday, May 19, 2011

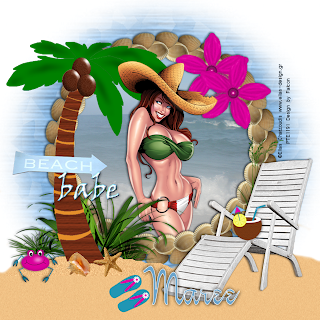
Beach Babe ♥


For this Tutorial you will need.

A Tube of your choice I am using the awesome artwork of ©Elias Chatzoudis,
which you must have a license to use you can get one at PTE.

Elements and Papers are from a scrap kit called Life's A Beach by Kim *Kim Korner* you can

purchase it Here.scrapindollars
Font: Kelly Brown
Drop Shadow of choice.
Mask *HorsePlays Pastures*, it's # 01 you can download it Here
Please visit Bev's wonderful site and leave some love.

Remember to Save Often!!!

Let's create

Open new image 700 x 700 , transparent.
Open kk_Beach_Frame01 click inside with Magic wand/selections/Modify/Expand by 4,
Select kk_Beach_paper23 paste as new layer/selections/Invert/Delete/
move below frame layer.
Give frame a drop shadow.
Select kk_Beach_Grass04 resize 35% move to left of frame,
add drop shadow.
Select kk_Beach_PalmTee move to left of layer then
add drop shadow.
Add your tube place in frame remove any areas showing past frame with eraser.
Select kk_Beach_Grass03 resize 45% move to right of frame,
add drop shadow.
Select kk_Beach_BeachChair resize 39% Image/Mirror/move to right of frame, add drop shadow.
Select kk_Beach_CoconutDrink resize 23% place on chair,
add drop shadow.
Select kk_Beach_Sign resize 85% place on trunk of palmtree, add drop shadow.
Select kk_Beach_Crab resize 16% move to left of palmtree,
add drop shadow.
Select kk_Beach_Shell_large03 resize12%,
add drop shadow.
Select kk_Beach_Shell_large05 resize 15% move to right plamtree,
add drop shadow.
Select kk_Beach_flipFlops02 resize 17% use your Pick tool to position them,
add drop shadow.
Select kk_Beach_Sand paste above frame layer. Using your Eraser Tool
on the edges on the left and right sides, see tag.

I add the word "babe" FG"6ca4cc BG:ffffff Stroke 1.Placed it on trunk of palm tree.
New layer select all paste into selection kk_Beach_paper28/apply mask/nerge group.

Add your Artist © and your name then crop and save.
This is only a guide and feel free to use any other element you wish.
Most of all have fun creating.


If you wish to show off your creations.Email me your creation and I will place it
on my show off Page. Thank you for using my tutorial.


Written and copyrighted to Maree (aka Falcon) on 19th May 2011.
Under no uncertain terms are you allowed to make money from anything
produced from this tut, this is against my TOU's.

Any similarities to this tutorial are purely coincidental.

Wednesday, May 18, 2011

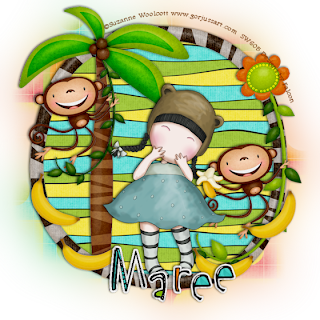
Going Banana's ♥


For this Tutorial you will need.

A Tube of your choice I am using the awesome artwork of ©Suzanne Woolcott,
which you must have a license to use you can get one at Here

Elements and Papers are from a scrap kit called My Friend The Monkey by *Peek A Boo Designs* you can purchase it Here.
Font: Of choice
Drop Shadow of choice.
Mask *Weescotslass *, #wsl_84 you can download it Here
Remember to Save Often!!!

Let's create

Open new image 650 x 650.
Selet BD_myfriendthemonkey_frame3 resize 40% clic inside with Magic wand/
Selection/Modify/Expand by 4 new layer paste into selection/BD_myfriendthemonkeypaper2.Deselect.

Selet BD_myfriendthemonkey_palm resize 75% place onleft of frame,
add deop shadow.
Selet BD_myfriendthemonkey_monkey1 resize 20% move to palm tree,
see tag for position, add dropshadow.
Selet BD_myfriendthemonkey_leaves1 resize 30% move to right of frame,
add drop shadow.
Selet BD_myfriendthemonkey_flower3 resize 15% place on right of frame,
add rop shadow.
Selet BD_myfriendthemonkey_monkey3 resize 20% move to ring of layer,
add drop shadow.
Selet BD_myfriendthemonkey_banana1 reisze 14% duplicate 3 times then place
around the frame, add drop shadow.
Selet BD_myfriendthemonkey_banana2 resize 8% place on monkey's hand on
right of frame,add drop shadow.

Add your tube give a drop shadow, placed mine in center of layer
, add drop shadow.
Selet BD_myfriendthemonkey_paper6/new layer select all paste into selection/
deselect/apply mask/merge group.
Duplicate then apply Gaussian Blur50 to original layer.

I used the Alpha supplied to create my name.


Add your Artist © and your name then crop and save.
This is only a guide and feel free to use any other element you wish.
Most of all have fun creating.


If you wish to show off your creations.Email me your creation and I will place it
on my show off Page. Thank you for using my tutorial.


Written and copyrighted to Maree (aka Falcon) on 18th May 2011.
Under no uncertain terms are you allowed to make money from anything produced from this tut,

this is against my TOU's.
Any similarities to this tutorial are purely coincidental.

Tuesday, May 17, 2011

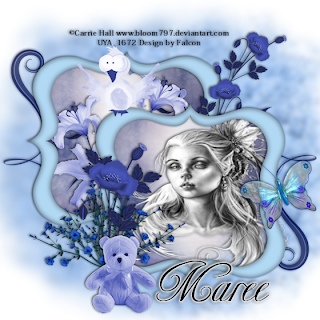
Vision In Blue ♥


For this Tutorial you will need.

A Tube of your choice I am using the awesome artwork of © Carrie Hall ,
which you must have a license to use you can get one at UYA

Elements and Papers are from a scrap kit called Blossom Blues by Shell *Shells Scraps*
you can purchase it Here.

Font: Ekaterina Velikaya Two

Drop Shadow of choice.

Mask *Designs By Vaybs*, it's #DVB111 you can download it Here
Remember to Save Often!!!

Let's create

Open new image 650 x 650.
Select frame 1/Magic wand select inside frame/Selections/Modify/Expand by 6
/pastepaper5/Selections/Invert/Delete/move below frame.

Add a Drop Shadow to frame, then duplicate your frame and paper move up and to the left.
Select flower 15 resize 35% move to back frame duplicate and move to right of frame/
add drop shadow.

Add your closeup tube to the front frame,add drop shadow.
Select flower13 resize 65% position between the frames, add drop shadow.
Select flower24 resize 75% move to left of front frame.

Select flower14/Image/Mirror/place in center of flower24, add drop shadow.
Select bird1 resize 42% move to left corner of front frame, add drop shadow.

Select butterfly2 resize 26% place on right side of front frame, add drop shadow.
Select doodle3 paste behind 2nd frame on left/add drop shadow.
Duplicate/Image/Flip position on right of frame.

Select bear1 resize 22% position in front of flowers on the left, add drop shadow.
New layer select all paste into selection paper1 apply mask/merge group.
Adjust/Blur/Guassin blur--10.

Add your Artist © and your name then crop and save.
This is only a guide and feel free to use any other element you wish.
Most of all have fun creating.

If you wish to show off your creations. Email me your creation and I will
place it on my show off Page. Thank you for using my tutorial.

Written and copyrighted to Maree (aka Falcon) on 16th May 2011.
Under no uncertain terms are you allowed to make money from
anything produced from this tut, this is against my TOU's.

Any similarities to this tutorial are purely coincidental.

Sunday, May 15, 2011

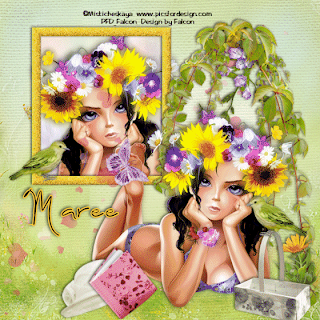
Dreaming ♥


For this Tutorial you will need.

A Tube of your choice I am using the awesome artwork of ©Misticheskaya ,
which you must have a license to use you can get one at PFD

Elements and Papers are from a scrap kit called Mothers Celebration by
Crys of *CreativeScraps*
you can purchase it Here.
Font: Dear Diary
Drop Shadow of choice.

Remember to Save Often!!!

Let's create

Open new image 700 x 700.
Open vines paste move to right of layer resize 110%, add drop shadow.
Open flowers 2 paste below vine layer resize 27%, see tag for placement,
add drop shadow.
Open your tube resize if needed and give a drop shadow.
Using your Preset tool draw out a med size square I used FG:#ffc639/X-out BG:
Effects/Inner Bevel with these settings:


Image/Add Noise/Uniform - Noise 50,add drop shadow.Click inside frame with Magic
wand/Selections/Modify/Expand 5.
Open paper5 resize by 50%/Selections/Invert/Delete/ move below frame.

Add your closeup-tube position hit delete/move below frame,
add drop shadow.

Open flower resize 25% move in front of vine right side add drop shadow.
Open basket resize 32% move to right of layer, add drop shadow.
Open hat resize 20% Image/Mirror/move to left of tube, add drop shadow.
Open diary resize 27% move to left of layer add drop shadow.

Open butterly2 resize 22% position above tube feet/duplicate twice/rename b1,b2,b3
thenAdjust/Add Noise/b1-25/ b2-30 then b3-35.


Open bird resize 24% add drop shadow/duplicate/place one on
basket handle and the other on left corner of frame.


Open Heart Scatter paste above frame layer.
Open paper4 paste above background layer.
Now delete background layer.

Add your Artist © and your name then crop and save.

If you wish to animate please continue.


This is only a guide and feel free to use any other element you wish.
Most of all have fun creating.

Animation.


Open AS then click on psp--Close-out layers b2,b3.
Edit/Copy Special/Copy Merged/ click into AS paste as new animation.
In psp Close-out layer b1/open b2 repeat as above.
Do this again for b3 layer.
Check your animation then save as a Gif.

If you wish to show off your creations.Email me your creation and I will place it
on my show off Page. Thank you for using my tutorial.


Written and copyrighted to Maree (aka Falcon) on 2011.
Under no uncertain terms are you allowed to make money from
anything produced from this tut,this is against my TOU's.


Any similarities to this tutorial are purely coincidental.

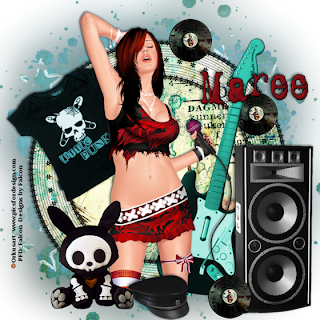
Rockin With You ♥


For this Tutorial you will need.

A Tube of your choice I am using the awesome artwork of © Verymany ,
which you must have a license to use you can get one at PFD

Elements and Papers are from a scrap kit called Rock OUt by Conchi of *Dnscraps*you can
purchase it Here.
Font: Metalic Avacodo
Drop Shadow of choice.
Mask *DesignsByVaybs*, it's #DVB-113 you can download it Here
Remember to Save Often!!!

Let's create

Open new image 700 x 700.
Select rockoutframe2 resize 85%,click inside with Magic wand/Selections/Modify/Expand 10/add drop shadow.

Select rockoutpaper 3/Selections/Invert/Delete/move below frame layer.
Select rockoutskirt2 resize 75%/Image/FreeRotate 30 left/place
on left of layer,add drop shadow.

Select rockoutguitar2/Image/FreeRotate 30 right
Select rockoutmusic4 resize 65% move to right of layer,add a drop shadow.

Add your tube resize if needed,move to center of layer,add drop shadow.
Select rockouthat resize 19% move to bottom of layer, add drop shadow.

Select rockoutnemo4 resize 50% move to left of layer,add drop shadow.
Select rockoutdisk3 resize 25%/add drop shadow/then duplicate twice,
move around till your happy with placement.
Select rockoutpaper10/apply mask/merge group.

Add your Artist © and your name then crop and save.
This is only a guide and feel free to use any other element you wish.
Most of all have fun creating.


If you wish to show off your creations.Email me your creation and I will place it
on my show off Page. Thank you for using my tutorial.


Written and copyrighted to Maree (aka Falcon) on 15th May 2011.
Under no uncertain terms are you allowed to make money from
anything produced from this tut, this is against my TOU's.

Any similarities to this tutorial are purely coincidental.

Friday, May 13, 2011

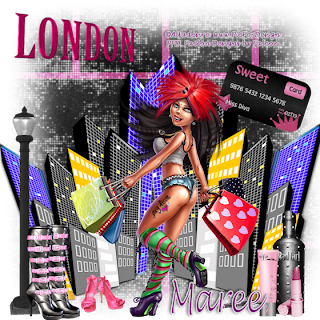
Shop To You Drop ♥


For this Tutorial you will need.

A Tube of your choice I am using the awesome artwork of ©Alfadesire,
which you must have a license to use you can get one at PFD
* Please note that I purchased my tube from *
Elements and Papers are from a scrap kit called The London Look by Ginna *Gina's Gems Scraps* you can purchase it Here.
Font: Of choice
Drop Shadow of choice.
Mask *Dee's Desing Depot*, it's #DD20 you can download it Here
Thanks Dee
Remember to Save Often!!!

Let's create

Open new image 700 x 700.
Select GGS_TheLondonLook_Cityscape resize to fit layer,
add Drop shadow.
Select GGS_TheLondonLook_Street lamp resize 120% move to left of layer,
add Drop shadow.
Select GGS_TheLondonLook_Creditcard 2 resize 75% move to top of cityscape
then using your Pick Tool angle it slightly, add drop shadow.

Select GGS_TheLondonLook_London Word Art place above cityscape,
using the Picktool grab the top left corner holding down the shiftkey
pull it slightly up, see tag, add drop shadow.
Select GGS_TheLondonLook_Lipliner resize 27% /Image/Freerotate 90 left
move to right of layer,add drop shadow.
Select GGS_TheLondonLook_LeatherBotle resize 28% move to right of layer,
add drop shadow.
Select GGS_TheLondonLook_Ligloss resize 22% move to right of layer,
add drop shadow.
Select GGS_TheLondonLook_Lipstick 1 resize 21% move to right of layer
in front of bottle,add drop shadow.
Select GGS_TheLondonLook_Strappyboot1 paste below streetlamp layer
then resize 48% add drop shadow/duplicate move it slightly
back from the other one.
Select GGS_TheLondonLook_Shoes resize 20% move to left of layer
Select your tube and place in center of layer, add drop shadow.
New layer select all copy paste into selection GGS_TheLondonLook_Paper 21
,apply mask/merge group.

Add your Artist © and your name then crop and save.
This is only a guide and feel free to use any other element you wish.
Most of all have fun creating.


If you wish to show off your creations.Email me your creation and I will place it
on my show off Page. Thank you for using my tutorial.


Written and copyrighted to Maree (aka Falcon) on 12th May 2011.
Under no uncertain terms are you allowed to make money from anything
produced from this tut, this is against my TOU's.
Any similarities to this tutorial are purely coincidental.
Monday, May 9, 2011

Babe 2Hot2Handle ♥


For this Tutorial you will need.

A Tube of your choice I am using the awesome artwork of © Keith Garvey,
which you must have a license to use you can get one at PTE.

Elements and Papers are from a scrap kit called 2Hot2Handle by Tammy,
*Tammy's Scraps*you can purchase it Here.

Font: Segeo Script

Drop Shadow of choice.

Mask*Dee's Design Depot*, it's #DD20 you can download it Here

Template by Stef Here
Remember to Save Often!!!

Let's create

Open your template delete the © layer and Raster layers 5 & 12.

On Vector 3 layer Select All/Float/Defloat/ paste as new layer 2Hot2Handle Paper 12.
Selections/Invert/Delete.Repeat with Vector 2 layer.

Select Raster5 layer Selections/Float/Defloat/ paste 2Hot2Handle Paper14 resize
65%/Selections/Invert/Delete. Delete origianl layer.

On Raster12 Select all/float/defloat/paste 2Hot2Handle Paper8 resize
65%/Selections/Invert/Delete. Delete original layer.

Select Raster7 select all copy pasteinto selection
2Hot2HandleElement62,Selections/delete/deselet. Repeat
this time using 2Hot2Handle Element81.

Repeat for Raster8 this time using 2Hot2Handle Elements 63 and 82.

Select 2Hot2Handle Element22 resize 45% place on corner of Raster 7 frame.
Select your tube and place in center of layer, add a drop shadow.
Select 2Hot2Handle Element 42 paste above your tube layer
then resize 65% move to lower part of tube.

Select 2Hot2Handle Element4 paste above raster 11, add a drop shadow.
Select 2Hot2Handle Element8 past reisze 85% move to right top of layer,
add a drop shadow.

Add new layer select all paste into selection 2Hot2Handle paper 4/deselect
then apply mask/merge group.

Select 2Hot2Handle Element 77 paste below mask layer then resize 85%
, add a drop shadow.

Add your Artist © and your name then crop and save.
This is only a guide and feel free to use any other element you wish.
Most of all have fun creating.

If you wish to show off your creations.Email me your creation and I will place it
on my show off Page. Thank you for using my tutorial.

Written and copyrighted to Maree (aka Falcon) on 9th May 2011.
Under no uncertain terms are you allowed to make money from anything
produced from this tut,this is against my TOU's.

Any similarities to this tutorial are purely coincidental.
Tuesday, May 3, 2011

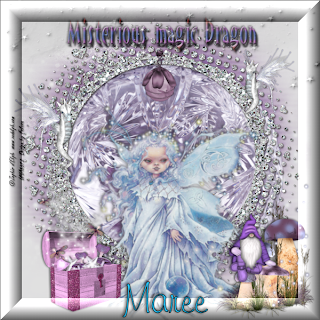
Magical Dragons ♥


For this Tutorial you will need.

A Tube of your choice I am using the awesome artwork of ©Zephir d'Elph
which you must have a license to use you can get one at UYA

Elements and Papers are from a scrap kit called Misterious Magic Dragon by Conchi, *Dnscraps* you can purchase it Here.

\Font:Freehand 591BT
Drop Shadow of choice.
Mask by Deanna *Dee'sDesignDepot*, it's #DD11
you can download it Here

Remember to Save Often!!!

Let's create

Open new image 700 x 700.
Open misteriousmagicdragondiamondframe, resize if needed.
Open misteriousmagicdragondragonball paste below frame layer.
Image/Flip resize 85%.
Add your tube adjust if needed.
Open misteriousmagicdragonmushroon2 reisze 3% move to right of layer.
Open misteriousmagicdragongnomo2 resize 38%/Image/Mirror /
place on top of mushrooms.
Open misteriousmagicdragonbaul paste resize36%,Image/Mirror/
move to left of layer.
Open misteriousmagicdragonstarss, move to to of layer,
then using your pick tool expand to edge of layer.
Give this a Drop shadow 1/1/50/3.

Open misteriousmagicdragonwordart move above frame.
Open misteriousmagicdragonballs2 resize this 23%, move under wordart,
looks like its hanging of wordart.

Open misteriousmagicdragonwhitedragon resize 26% move to center left of
frame/duplicate/Image/Mirror move up then resize 85%.
New layer above background layer/select all/open misteriousmagicdragonpaper9
/apply mask/merge group.Resize 110%.

Give all other layers a Drop Shadow. I used 2/2/50/5.
I add a frame using UnlimitedFilters2 with these settings:


Add your Artist © and your name then crop and save.
This is only a guide and feel free to use any other element you wish.
Most of all have fun creating.

Email me your creation, so I can show off your creations on my blog.
Thank you for using my tutorial.

Written and copyrighted to Maree (aka Falcon) on 4th May 2011.
Under no uncertain terms are you allowed to make money from anything
produced from this tut, this is against my TOU's.

Any similarities to this tutorial are purely coincidental.
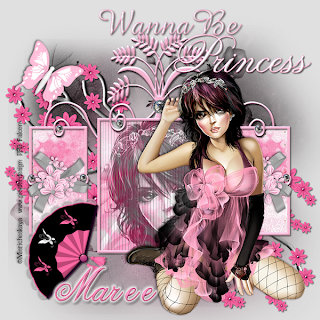
WannBe Princess ♥


For this Tutorial you will need.Add Image
A Tube of your choice I am using the awesome artwork of © Misticheskaya ,
which you must have a license to use you can get one at PFD

Elements and Papers are from a scrap kit called Cherry Blossom by Jen *Sleek n Sassy*
you can purchase at Here
Font: Amazone
Drop Shadow of choice.
Mask by *HorsePlays Pasture*,it's #21 you can download it Here

Remember to Save Often!!!

Let's create
Open new image 700 x700.
Select picture holder resize 85%. Click inside left frame (3 sections) with Magic

Wand/selections/Modify/Expand by 6/select paper 3 paste/Selections/
Invert/hit Delete/move below frame layer.
Using dbs Flux-Bubbles apply these settings/duplicate/Image/Mirror.


Select center frame using Magic wand paste paper 3/selections/Invert/Delete/
move below frame.
Then using Tramages-Tow The Line-default setting,click ok.
I used the closeup tube copy paste into selection then lower Opacity to 60/
apply Luminance(L)/Deselect.

Select Flowers an Ribbons2 resize 45% place on center left frame/duplicate/Image/Mirror.
Add your main tube resize if needed place on right of layer.
Select Flower Branch paste below framepaper move bottom right/duplicate/
Image/mirror/Flip.
Select Fan resize 65% move to lowerleft of frame.Angle slightly to left
using your Pick Tool.
Select Butterfly resize 35% place on left top of layer.

New layer select all paste into selection paper4, apply mask/merge group.
Duplicate layer/Adjust/Blur/Gaussian blur 50/ok.
Give all a Drop Shadow I used 2/2/55/4.
Font FG:c54a7a BG:f88eb8 with Inner Bevel:


Add your Artist © and your name then crop and save.
This is only a guide and feel free to use any other element you wish.
Most of all have fun creating.

Email me your creation, so I can show off your creations on my blog.
Thank you for using my tutorial.

Written and copyrighted to Maree (aka Falcon) on 4th May 2011.
Under no uncertain terms are you allowed to make money from anything
produced from this tut,this is against my TOU's.

Any similarities to this tutorial are purely coincidental.