Friday, December 31, 2010

Hey Hey 2 The New Year ♥


Supplies Needed

Tube I'm using the artwork of Keith Garvery, you find it at MPT
Scrapkit by Heart of Essence called - New Year ,
you can find it Here.The creativity box
Font:Anglia
Drop Shadow of choice.
Mask wsl_84 by Weescotslass

Remember to Save Often!!!

Let's create

Open layer 650 by 650 flood fill #ffffff
Open 02he-newyear-paper open Material properties click on Pattern and find.
using your Preset tool-draw out a circle,
then - Objects-Align-center in canvas-deselect(trl+D).
Duplicate layer then resize by 115, flood fill with white
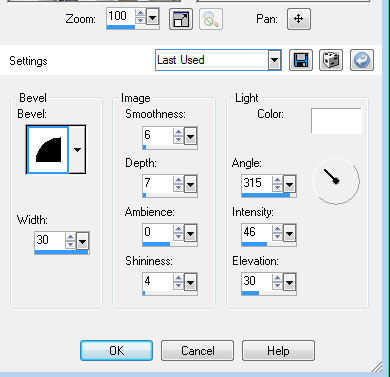
then give a drop shadow 2/2/50/10.
Adjust-Add noise 50 Guassian tick Monochrome box-ok.
Click inside orignal layer copy paste your close-up tube
Selections-Invert-Delete, deselect.
Open 02he-newyear-elements paste above background layer.
Open 04he-newyear-elements resize 45 percent place top right corner.
Open 13he-newyear-elements resize 38 percent move to right of layer
Open 08he-newyear-elements resize 32 percent place at top of circle.
Open 47he-newyear-elelment resize 28 percent place lower edge of cirlce.
Then using eraser clean up the edges to give a smooth finish, see tag.
Open 18he-newyear-element resize 38 percent place a t bottom of circle.
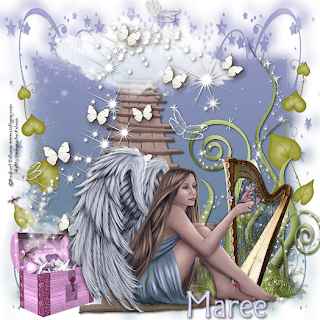
Add your main tube place to left of circle.
Give all a Drop Shadow.
Add new layer above background layer. Flood fill with @000000
Apply your mask-merge group.

Add your Artist © and your name then crop and save.
This is only a guide and feel free to use any other element you wish.
Most of all have fun creating.

If you wish to email me your creation, I then can show off your wonderful creations.
Thank you for using my tutorial.

Written by Maree (aka Falcon) on 31 December 2010
Any similarities to this tutorial are purely coincidental
© Maree(aka Falcon)

Shifting Wheels of Time


Supplies Needed


Tube I'm using is the artwork of Ray Leaning, you find it Here mpt
Scrapkit by Digicats (& Dogs) called Shifting Gears-PTU ,
you can purchase it Here.
Font:
Drop Shadow 2/2/50/5.
Mask wsl_84 by Weescotslass
Remember to Save Often!!!

Let's create

Open new image 650 x 650 flood fill with #000000.
New layer flood fill with a Gold Gradient color. Apply mask-merge group.
New layer using your Selection tool draw out a large circle,
Open DCD_ShGe_Paper03 paste into selection, Deselect.
I then using Text tool wrote Happy New Year around
the out side of circle this is optional.
Open DCD_ShGe_Fireworks2,3 and 4 paste behind circle layer and arrange,
Open DCD_ShGe_Gears 03 image-mirorr, resize 65 percent move to the right.
Open DCD_ShGe_Gears 01 resize 50 percent move to the left.
Open DCD_ShGe_Cog01 resize 45 percent place above gears 01.
Open DCD_ShGe_New Years Clock 02 resize 75 percent move top left.
Open DCD_ShGe_Curly Bow resize 35 percent move top of cirlce,
Open DCD_ShGe_Ribbon 05 resize 65 percent place lower right side of gears.
Open DCD_ShGe_2011 WA02 resize 55 percent place in center of cirlce, see tag.
Open your tube place give a Drop Shadow.
Open DCD_ShGe_Chanpagne02 resize 45 percent move to the right.
Open DCD_ShGe_Metallic Flute resize 32 percent move to right.
I did not apply Drop Shadow to the fireworks and
all other layers have a Drop Shadow.

Add your Artist © and your name then crop and save.
This is only a guide and feel free to use any other element you wish.
Most of all have fun creating.Gears 03 resize

If you wish to email me your creation, I then can show off your wonderful creations.
Thank you for using my tutorial.

Written by Maree (aka Falcon) on 31 December 2010
Any similarities to this tutorial are purely coincidental
© Maree(aka Falcon)

Wednesday, December 22, 2010

A Wonderful Christmas Time ♥

Supplies Needed


Tube I'm the artwork of PinUpToons, you willfind it Here
Scrap kit by Faba-PTU called White Christmas,you can find it Here.
Font: of choice
Drop Shadow of choice.

Remember to Save Often!!!

Let's Create


Open new image 700 x 550 we will resize later.
New layer select all open Faba_white christmas_pp10 paste into selection-deselect.
Open Faba_white christmas_El2 (11) resize 53 percent.
Open Faba_white christmas_El1 (14) resize 38 percent place below frame layer.
Open Faba_white christmas_El2 (20) resize 32 percent Image - Mirror
Open Faba_white christmas_El1 (4) resize 28 percent place at bottom of frame.
Open Faba_white christmas_El2 (32) resize 28 percent place on left side of branch.
Using your Eraser Tool erase part of the branch in front of green ribbon,
then the silver ribbon on branch.
giving the effect its behind the green ribbon.
Open Faba_white christmas_El2 (19) resize 28 percent place
right side of branch using your Eraser carefully
remove part of branch, see tag.
Open Faba_whitechristmas_El2 (3) resize to fit bottom of frame.
Add your tube below frame layer resize if needed.
Open Faba_white christmas_El shaded (13) resize 43 percen
t place fright side of frame.
Open Faba_white christmas_El2 (5) resize 21 percent
place on lower right side of frame.
Open Faba_white christmas_El1 (29) resize 16 percent place on right of frame.
Open Faba_white christmas_El1 (35) resize 13 percent
place on lower left side of frame.
Give a light Drop Shadow.

Add your Artist © and your name then crop and save.
This is only a guide and feel free to use any other element you wish.
Most of all have fun creating.


If you wish to email me your creation, I then can show off
your wonderful creations.
Thank you for using my tutorial.
Written by Maree (aka Falcon) on 22 December 2010
Any similarities to this tutorial are purely coincidental

© Maree(aka Falcon)

Magical Winter ♥


Supplies Needed

Scrap kit by Dnscraps called Magic Winter Snow
you can purchase it Here.
Drop Shadow of choice.
Mask_13 by Sharlimar Designs Here

Remember to Save Often!!!

Let's create
Open new image 650 x 650 fill with #dde0eb.

New layer select all open magicwintersnowpaper 14 paste into
selection apply mask, merge group.
Duplicate.Give the original layer only a Drop Shadow 2/2/50/3.
Open magicwintersnowballs resize 65 percent place in frame see tag.
Open magicwintersnowflower resize 35 percent place on top left corner of frame.
Open magicwintersnowleaves resize 28 percent duplicate,
arrange behind flower, move them around till your happy with placement.
Open magicwintersnowelf resize 52 percent Image-mirror,
place right lower edge of frame,
Open magicwintersnowtree resize 55 percent paste below snowball layer.
Open magicwintersonowder Image mirror resize 55 percent place left of frame.
Open magicwintersnowtreeglitter paste above snowball layer.
Open magicwintersnowribbonbow resize 90 percent Image-mirror,
paste below snowleaf layer.

Add your Artist © and your name then crop and save.
This is only a guide and feel free to use any other element you wish.
Most of all have fun creating.

If you wish to email me your creation,
so I can show off your wonderful creations.
Thank you for using my tutorial.

Written by Maree (aka Falcon) on 22 Decenber 2010
Any similarities to this tutorial are purely coincidental
© Maree(aka Falcon)

Fairy Dreamz ♥


Supplies Needed


Tube I'm the artwork of Rachel Tallomy, you can find er artwork Here


Scrapkit byDestiny Scrap Designs - My Fairytale ,you can find it Here.

Font: of Choice

Drop Shadow of choice.

Mask_19 by Suzzanna Here


Remember to Save Often!!!


Let's create


Open new image 650 x 650 flood with #ffffff.

New layer select all - open DSD_MyFairytale_Paper_01 paste into selection,

apply mask, merge group.

Duplicate on orginal layer -Guasuain Blur 10.

Open DSD_MyFairytale_Element_28 resize 65 percent move to side of mask

duplicate-Image-Mirror.

Open DSD_MyFairytale_Element_13 resize 65 percent center on mask.

Open DSD_MyFairytale_Element_05 resize 75 percent place above sidewalk

Add your tube resize if needed. I placed mine sitting on edge of walkway.

Open DSD_MyFairytale_Element_12 reisze 75 percent Image-Mirror,

place on right side of layer

Open DSD_MyFairytale_Element_08 resize 75 percent move

around till your happy with placement.

Open DSD_MyFairytale_Element_10 resize 55 percent Image-mirror,

place on left of layer.

Open DSD_MyFairytale_Element_14 resize 65 percent

Image-mirror move to left of layer, above chest.

Give all a Drop Shadow 2/2/50/5 except your cloud and mask layers.


Add your Artist © and your name then crop and save.

This is only a guide and feel free to use any other element you wish.

Most of all have fun creating.

If you wish to email me your creation, I then can show off

your wonderful creations.

Thank you for using my tutorial.

Written by Maree (aka Falcon) on 23 December 2010

Any similarities to this tutorial are purely coincidental

© Maree(aka Falcon)

Child of The Night ♥


Supplies Needed

Tube I'm using the artwork of Jasmine Becket-Griffith,
you can purchase from Here.

Scrapkit byDestiny Scrap Design called Children of the Night,
you can find it Here.

Font: Segoe Script
Drop Shadow of choice.
Remember to Save Often!!!

Let's create


Open new image 650 x 600.

Select All copy paste into selection DSD_ChildrenOfTheNight_Paper_9.
Deselect.
Open DSD_ChildrenOfTheNight_Element_11 resize to fit.
Open DSD_ChildrenOfTheNight_Element_29 resize 46 percent.
Open DSD_ChildrenOfTheNight_Element_02 resize 75 percent
place top right corner.
Open DSD_ChildrenOfTheNight_Element_26 move to top left corner.
Open DSD_ChildrenOfTheNight_Element_21 move to left of layer.
Open DSD_ChildrenOfTheNight_Element_09 placein center of layer.
Open DSD_ChildrenOfTheNight_Element_24 resize 65 percent,
moveso the center light is in lamp, see tag.
Open DSD_ChildrenOfTheNight_Element_36 resize 45 percent
place on fence.
Open your tube/s I place one sitting on the fence and
the other on right side of layer.
Open DSD_ChildrenOfTheNight_Element_12 place top of layer, see tag.
Open DSD_ChildrenOfTheNight_Element_41 resize 55 percent,
move it around till happy with placement around the ribbon.
Using your eraser tool erase parts of the ribbon that are overhanging.

Add your Artist © and your name then crop and save.
This is only a guide and feel free to use any other element you wish.
Give all a light drop shadow. then Merge Flattened. Image-Copy.
Image add Border Select a color from your tube.
Tick the Symmetric box then place 1 in boxes.
Select Add Borders again this time with another color from tube.
This time use 3.
Add Border again this time with using 1 with the first color used.
Image-Add Border select any color width 25.
Using Magic wand click inside then paste your picture into frame.
Effect-Reflection effects-Kaleidoscope play with the setting
till you are happy with the effect,
do this by playing with the dice Randomise button.
Effects-3D-Inner Bevel with these setting:


Most of all have fun creating.
If you wish to email me your creation, I then can show off
your wonderful creations.
Thank you for using my tutorial.
Written by Maree (aka Falcon) on 21 December 2010
Any similarities to this tutorial are purely coincidental
© Maree(aka Falcon)

Saturday, December 11, 2010

Joy To The World ♥


Supplies Needed

Scrap kit by WhackyWinnie Designz is PTU Christmas Time ,
you can find it Here.
Font: FreeStyle Script
Drop Shadow of choice.
Mask of choice circle on is best.
Remember to Save Often!!!

Let's create

Open new image 700 x 550.
Select Rectangle Tool using these settings draw out a rectangle.


I used gold-foreground for the border and X- out the background color.
Duplicate twice rename layers F1,2,3.
Image-FreeRotate F1 left 18 degrees F3 right 18 degrees.Closeout background layer merge.
Click inside frames with magic wand.
Open WWW-CT_Paper11 past, Selection-Inver-hit delete,move below frame.
Open WWW-CT_Snowman1,2,3 resize and place in frames.Give them a light Drop Shadow.
X-out background layer merge all.Open background layer.
New layer flood fill with #bc994d, I used a circle mask.merge group.
Then apply Xfenoconstellation with these settings:
Open WWW_CT_Holly resize 23 percent duplicate place where frames join.
Open WWW_CT_Bow1 resize 15 percent place on center frame.
Open WWW_CT_Tree1 resize 35 percent place on right of frame.
Open WWW_CT_Box3 resize 16 percent place in front of tree.
Open WWW_CT_NPSign resize 35 percent place on left of frame.
Open WWW_CT_SantaSleigh resize 22 percent, Image-Mirror.
Open WWW_CT_PolarBear1 resize 24 percent place near sleigh.
Open WWW_CT_Penguin1 resize 56 percent place front of sleigh.
Open WWW_CT_Candle1 resize 28 percent place in center of mask, see tag.
Open WWW_CT_Box2 resize 23 percent place on left of bear.
Give all a Drop shadow 2/2/50/5
Add your Artist © and your name then crop and save.
This is only a guide and feel free to use any other element you wish.
Most of all have fun creating.

If you wish to email me your creation, I then can show off your wonderful creations.
Thank you for using my tutorial.

Written by Maree (aka Falcon) on
Any similarities to this tutorial are purely coincidental
© Maree(aka Falcon)

Wednesday, December 8, 2010

All Wrapped Up ♥


Supplies Needed
Tube I'm the artwork of Ismael Rac, you find it Here
Scrapkit by Rebellious Scraps is PTU Christmas Cheer ,you can find it Here.
Font: Cooper Std Black
Drop Shadow of choice.

Remember to Save Often!!!

Let's begin

Open new image 700 x 700.Fill with #0000000

Open frame 5 resize 90 percent, click inside with Magic wand.
Open paper 10. Selections-Invert-Delete, move below frame.
Open christmas tree 3 resize 87 percent move to center of frame.
Open your tube resize if needed place on right of frame.
Open present 3, 7 and 8 resize as needed place at bottom of tree.
Open toys resize 28 percent Image-mirror place on bottom left of frame.
Open Candycane resize 20 percent place on left of toys, see tag.
Open bells 2 resize 23 percent place top left corner of frame.
Open ornaments chain resize 32 percent place top right corner of frame.
Open deco resize 24 percent place on top of bells tube,see tag, then duplicate
Image-Mirror, adjust if needed.
Open santa and sleigh resize 23 percent place above tree.
Give all layers a Drop shadow 2/2/50/5.

Add your Artist © and your name then crop and save.
This is only a guide and feel free to use any other element you wish.
Most of all have fun creating.

If you wish to email me your creation, I then can show off your wonderful creations.
Thank you for using my tutorial.

Written by Maree (aka Falcon) on 8th December 2010
Any similarities to this tutorial are purely coincidental
© Maree(aka Falcon)

Sunday, December 5, 2010

Snow Snow n more Snow.... ♥


Supplies Needed

Tube I'm using,Tony Tzanoukakis you purchase Here
Scrapkit by Sweet Occasion Designs called Let it Snow,Let it Snow PTU, Here.
Font: Candlemas
Drop Shadow 1/1/50/4
VDL Adrenaline-SnowScape
Snow Here
Remember to Save Often!!!
Let's create

Open new image 700 x 600.
Open aos frame 6 resize 75 percent click inside with magic wand.
Open aos paper10, new layer paste into selection, deselect.
Click on frame layer using Snowscape with these settings:

LovelyFlowers_Flower5_Scrape and Tubes resize 75 percentmove to right duplicate, mirror.
OPen snowmaan2 reisize 26 pecent place left side of frame,give a drop shadow.
Open snowman3 mirror then resize 25 pecent place lower right side.
open snowTrees_Tree2_Scrap and tubes resize 75 percent place in center of frame.
Open tube resize to fit then move behind tree, see tag.
Open snowman* resize 73 percent plae to right of tree,see tag.
Open button 2 resize 38 percent, duplicate-mirror place top corners.
Open DRA BOW 6 resize 35 percent place on top of button, duplicate-mirror.
Give all a drop shadow.
If you wish to animate please continue.
Add your Artist © and your name then crop and save.
This is only a guide and feel free to use any other element you wish.
Most of all have fun creating.

Open Animation Shop
In psp X-out all layers except background and paper layers,
copy paste into AS as new animation, duplicate it 4 times (ctrl+L)
,you now should have 5 frames.
Open your snow using Ctrl+A to select all copy paste Into selected frame.
Back in psp open all layers then X-out background and paper layers
Copy merged-copy special
in As paste as new animation. Copy paste into selection.
Save as a Gif.

If you wish to email me your creation, I then can show off your wonderful creations.
Thank you for using my tutorial.

Written by Maree (aka Falcon) on
Any similarities to this tutorial are purely coincidental
© Maree(aka Falcon)

Thursday, December 2, 2010

No Peeking ♥

Supplies Needed
Tube of choice,I'm using ©Wendy Gerber, from MPT 
Scrapkit by Puddicat Creations called Christmas Memories you can purchase it Here.
Font:of choice.
Drop Shadow 2/2/50/5.
Remember to Save Often!!!

Let's begin

Open new image 650 x 650.
Open pdc_fireplace  resize 65 percent.
Open pdc_bownpoinsettea1 resize 34 percent place on top corner then duplicate,Image-mirror.
Open pdc_candel1 resize 38 percent  duplicate, Image-mirror.
Open pdc_wreath1 resize 39 percent place center of fireplace.
Open pdc_christmastrees2 resize 75 percent place right side.
Open pdc_candycanes1 resize 36 percent place on left side of fireplace.
Open pdc_gingerhouse resize 42 percent place right side of tree.
Open pdc_bear1 resize 39 percent place in front of tree.
Open pdc_gift4 resize 37 percent place left side of tree.
Give them all a Drop Shadow 2/2/50/5.
Open pdc_wordart1 resize 65 percent then using your Pick tool straighten it up.
Duplicate click on original layer Adjust-Blur-Gaussian blur 20-click ok.
On duplicated layer Adjust - add/remove noise- Uniform-Noise 45-Monochrome ticked-click ok.
Merge layers visible then resize 95 percent.
Add your tube give a light Drop shadow.
Open pdc_frame adjust frame to fit using pick tool, give a drop shadow to frame.
Using your Selection tool draw a square around the frame.
Open pdc_paper7 new layer paste into selection -deselect. Move below merged layer and frame.
Open pdc_bell1 resize 39 percent give a light drop shadow,duplicate - Image-Mirror.
Open pdc_bow1 resize 32 percent place right bottom of frame, give a drop shadow.
Open pdc_bow2 resize 32 percent place left bottom of frame, give a drop shadow.

Add your Artist © and your name then crop and save.
This is only a guide and feel free to use any other element you wish.
Most of all have fun creating.

If you wish to email me your creation, I then can show off your wonderful results.
Written by Maree (aka Falcon) on 30 November 2010
Any similarities to this tutorial are purely coincidental
© Maree